Introduction
OOPS !!! This is our main module that integrates the entire workflow into a credit union. The software thus developed covers almost all the management elements of an EMF preparing the data for a secure and standardized digitization. It elaborates on the following:
- Administration
- Cash In
- Payments
- Loans
- Reports
- Management
Installation
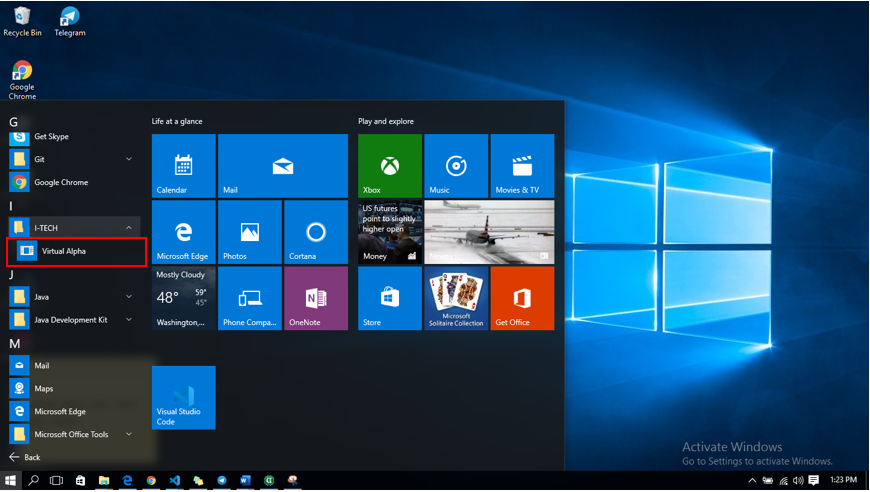
Starting/Launching the Application
Once the virtual alpha applicaiton is completely installed, click on the
windows button
on your Keyboard.
Select all apps
scroll to find the folder I-TECH
Click the dropdown, to see the Virtual Alpha setup starter
Double-click the setup to start the application.
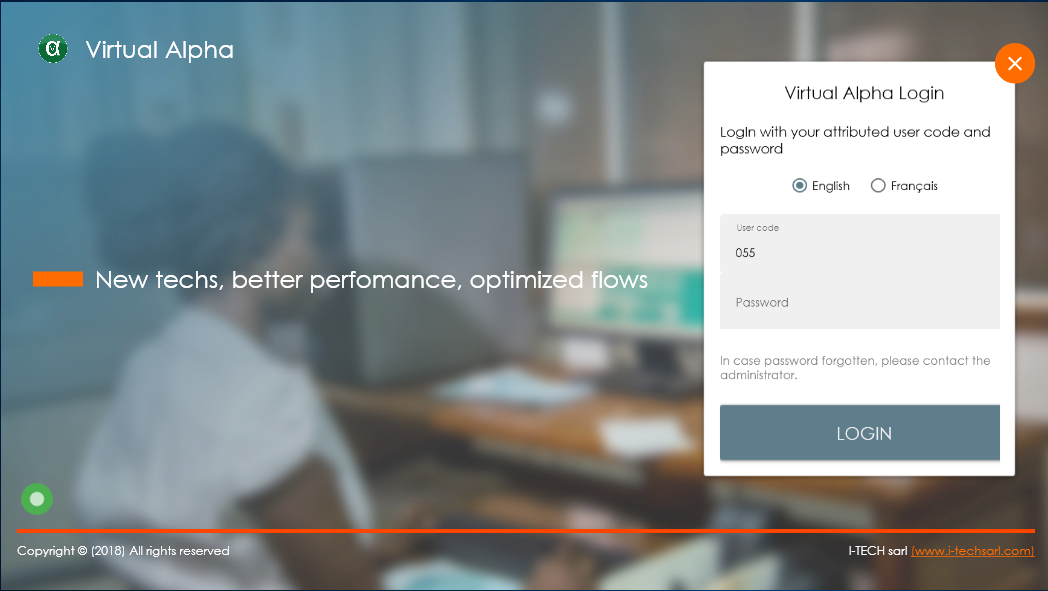
Login page
Once the application is launched, the login screen is displayedOn this page, an icon
 shows on the bottom left if there is connection,
and this is when it is appropriate to login
shows on the bottom left if there is connection,
and this is when it is appropriate to login If the icon is replace with
Once the connection is good
Enter the username
Enter the password
Then clcik on the Login button
The home page is displayed on a successful login
Adding a User to the System
Once the application is open, click on the menu File --> Account Paramater --> System Parameter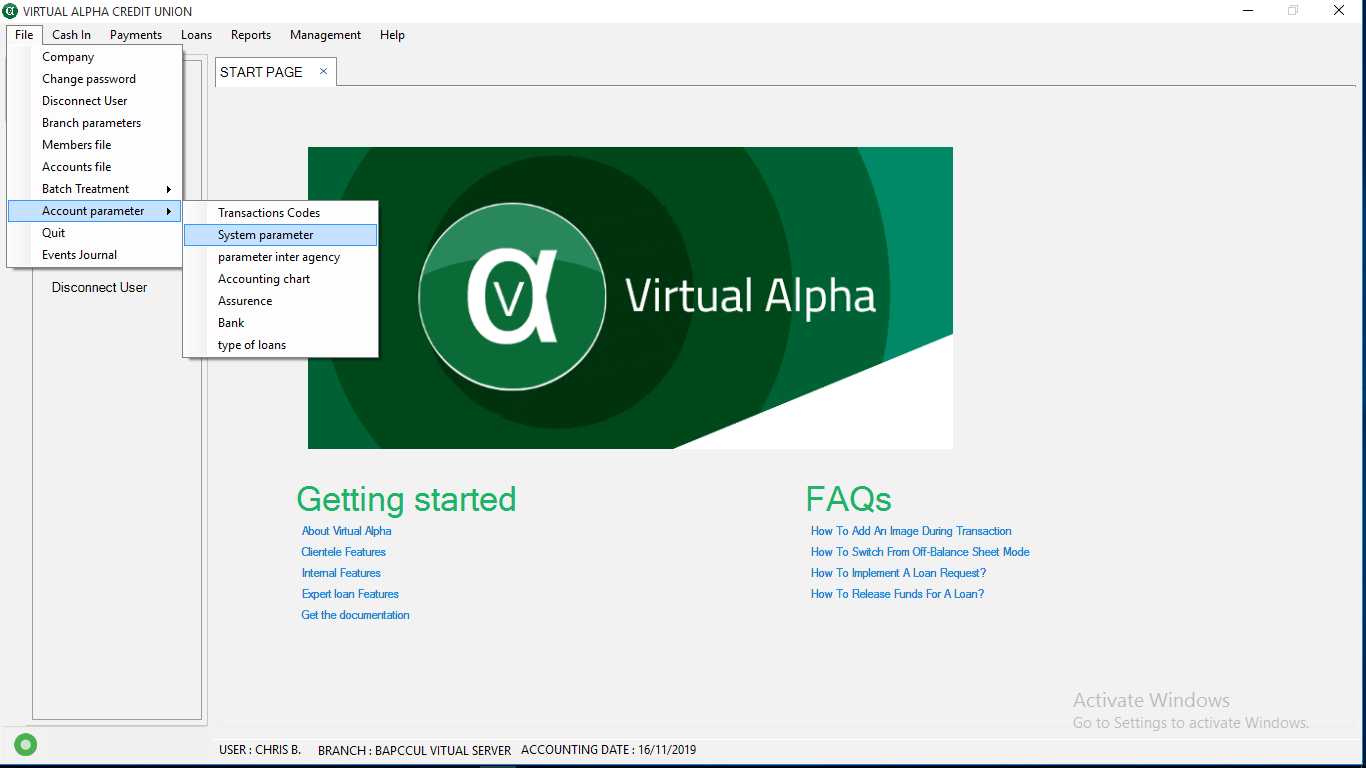
It opens the System Parameter page.
click on the item Machine Name
NB: Here we intend to register any computer that is permitted to be used by any system user to connect to the Virtual Alpha system.
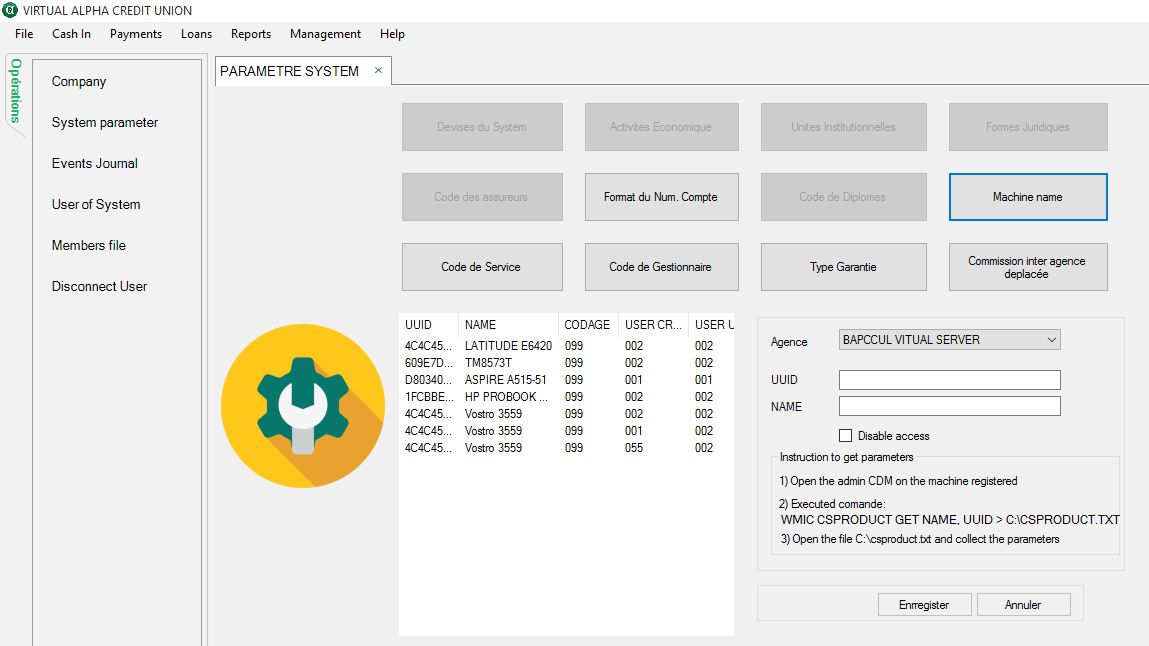
Follow the steps below the form on the right-hand and execute the command:
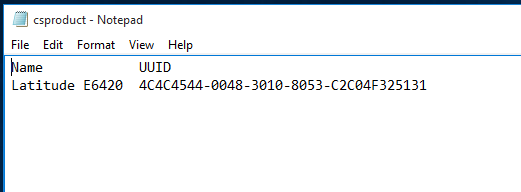
WMIC CSPRODUCT GET NAME, UUID > C:\CSPRODUCT.TXT
NB: The command should be executed on the command line with the Administrator privillage
How to execute the command
Click on the windows button or the search icon on the right-side of the Taskbar.Then type: cmd, to search for the commandline tool,
Then right-click on the commandline and select Run as Administrator
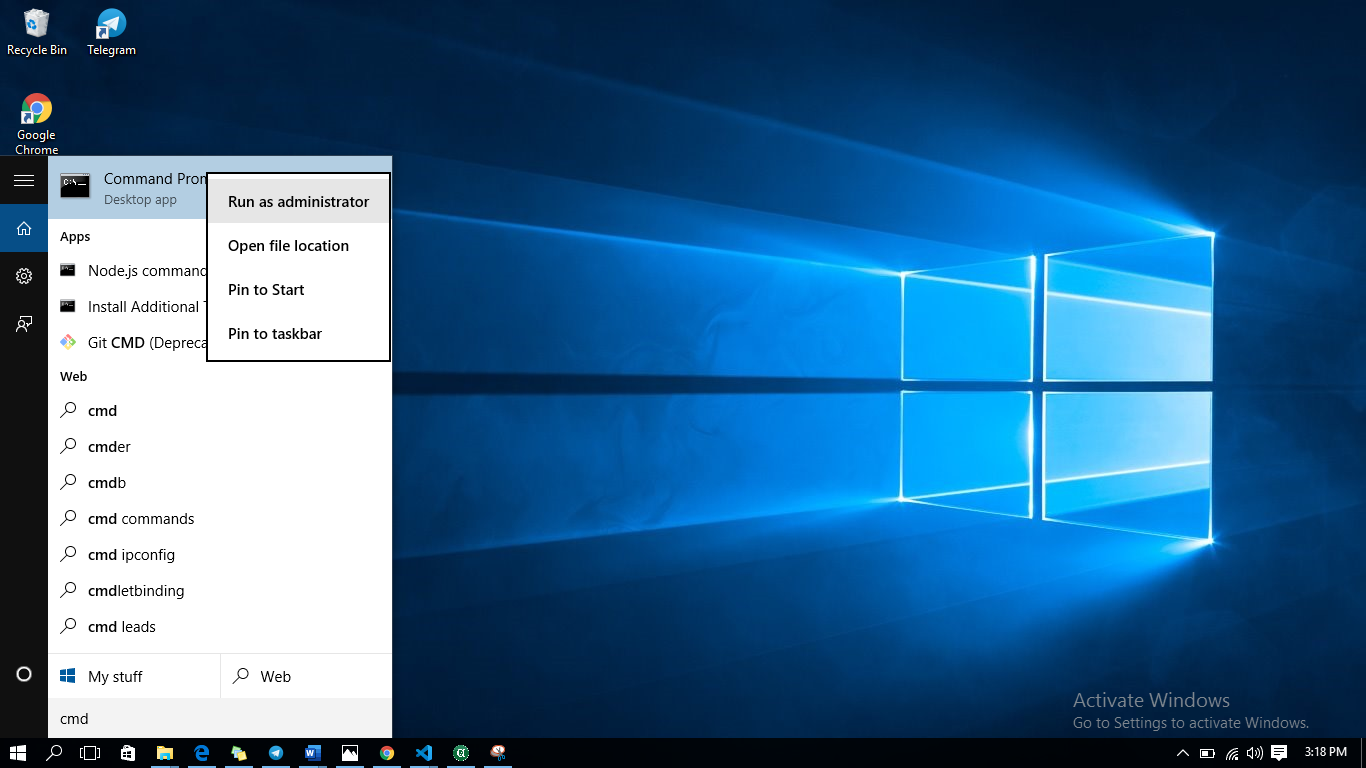
you will be asked to accept changes, select yes and click on Enter, to accept changes
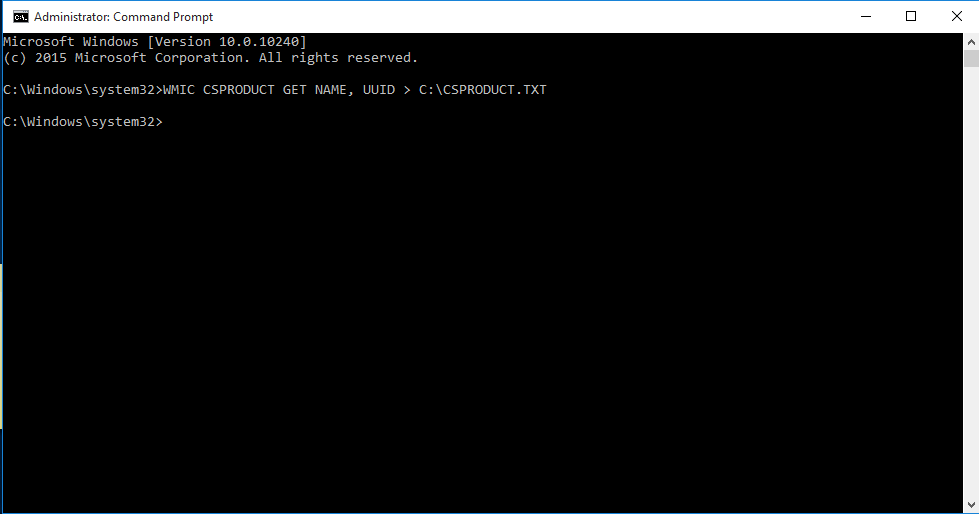
Once the command line is open, type in the command given above:

Copy and paste the command on the command line, then click on Enter ON YOUR Keyboard
NB: Now follow the link to the Folder on explorer, to locate the file.
that is: C:\ --> csproduct.txt
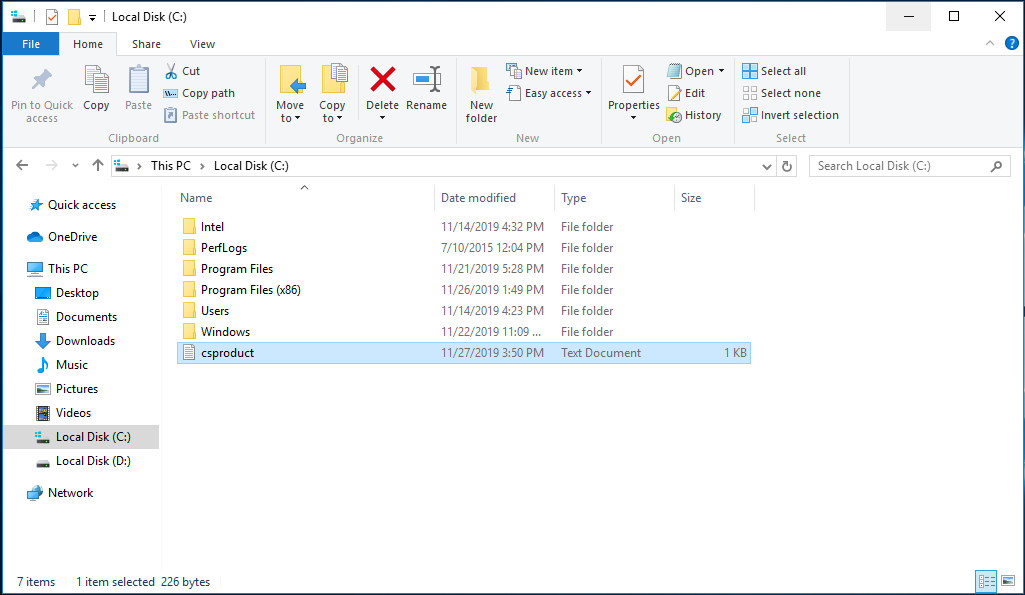
Now: open the document and use the values in it to fill the form of system settings --> Machine Name
NB Only a maximum of four (4) tabs can be open at a time.
Administration
Company
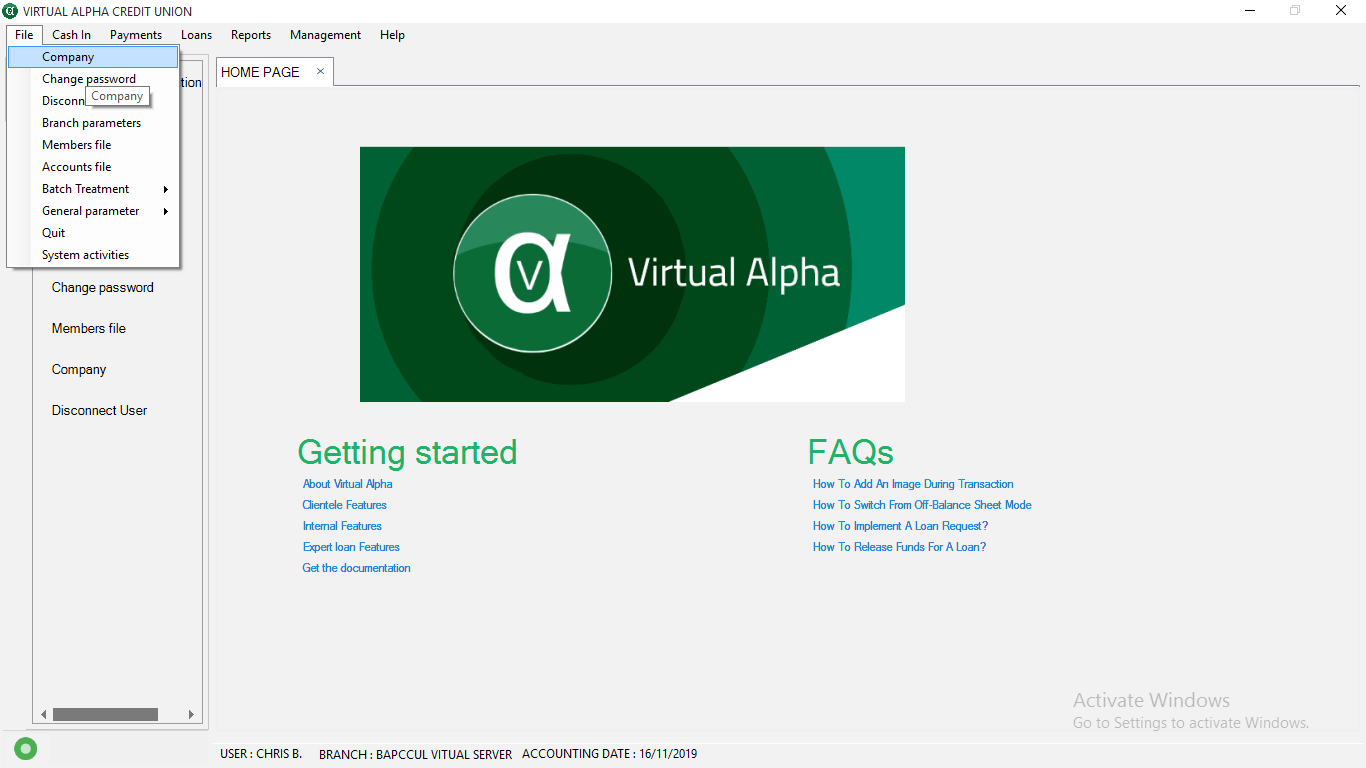
Function: This is where the registered information of the Company or enterprise or Ceredit Union is modified after being created when the liscense is obtained. Here the appropriate user can modify the company's information as required.To access the Company page, click on File on the horizontal menu, then select company
By default, the view is locked, so click on the
 , to unlock or lock the view.
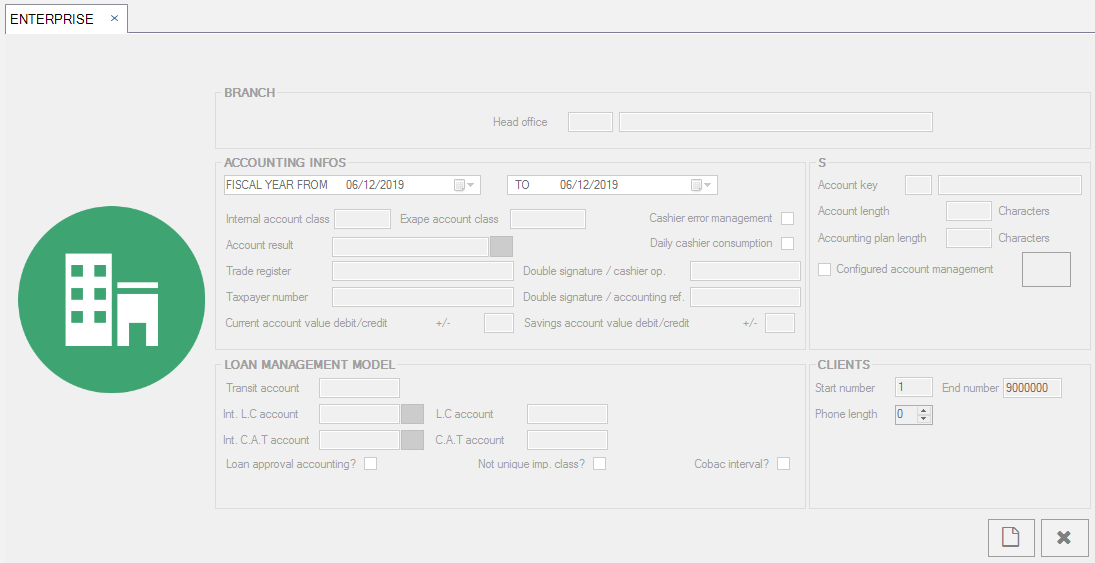
After making changes, click on
 to save the new change.
To cancel the process, click on

Branch Parameters
Function: Here, a new branch is created for the company or credit union, by a user with the appropriate access rights.By default, the view is locked, click on the
to unlock or lock the view. 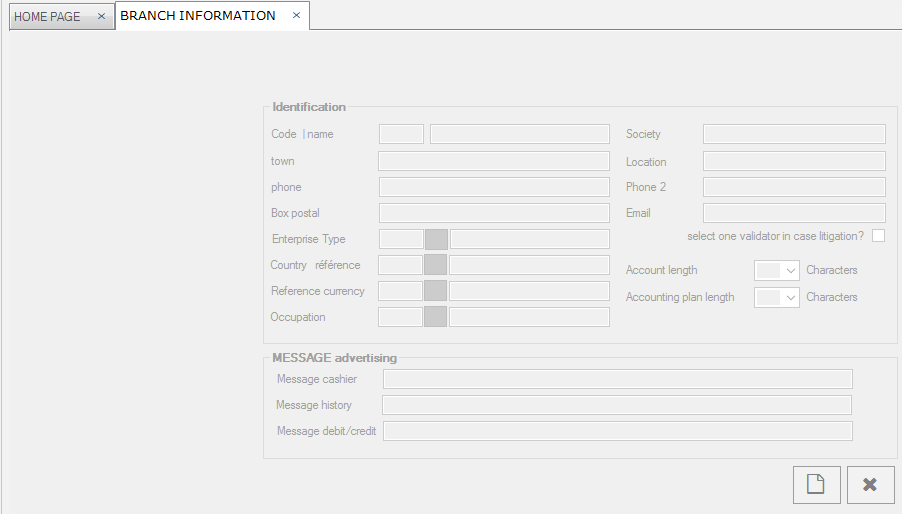
After making changes, click on
to save the new change. 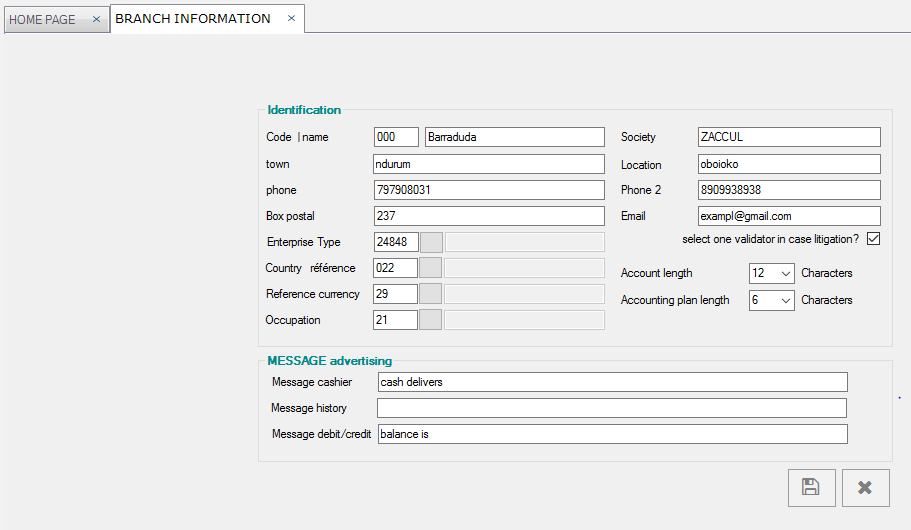
To cancel the process, click on
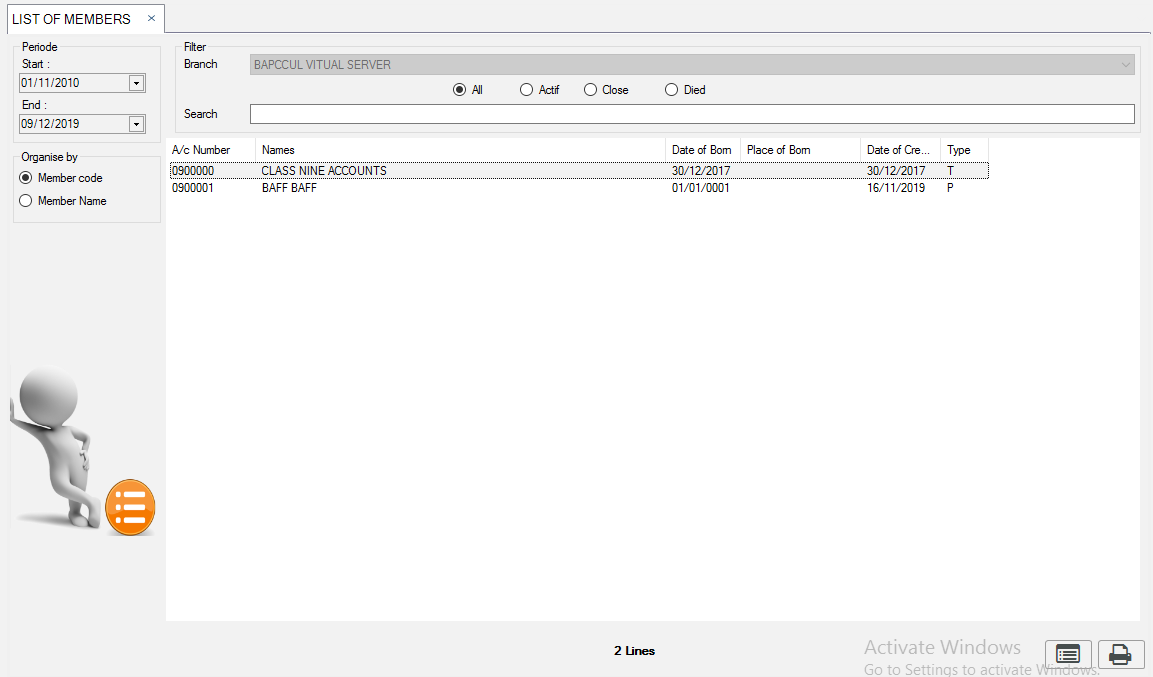
Members File
Function: Here, a user can get a list of members based on when they were added or created in the system.Process:
Click on File on the menu, then click on Members File
Enter the Period start date
Enter the Period End date
NB: This dates marks when the client was created or added into the system. Select: organise By:
Member Code /Member Name
Select Branch. this is only possible if your user is of the Headquarter. or the Main / Principal Branch.
Search: you can also search the Member by name or code
Also filter the list of Members by selecting one of the following options:
All / Active / Close / Died
Once the fields are entered, click on
 to display the member(s).
 Click on
 to print
the list.
to print
the list.
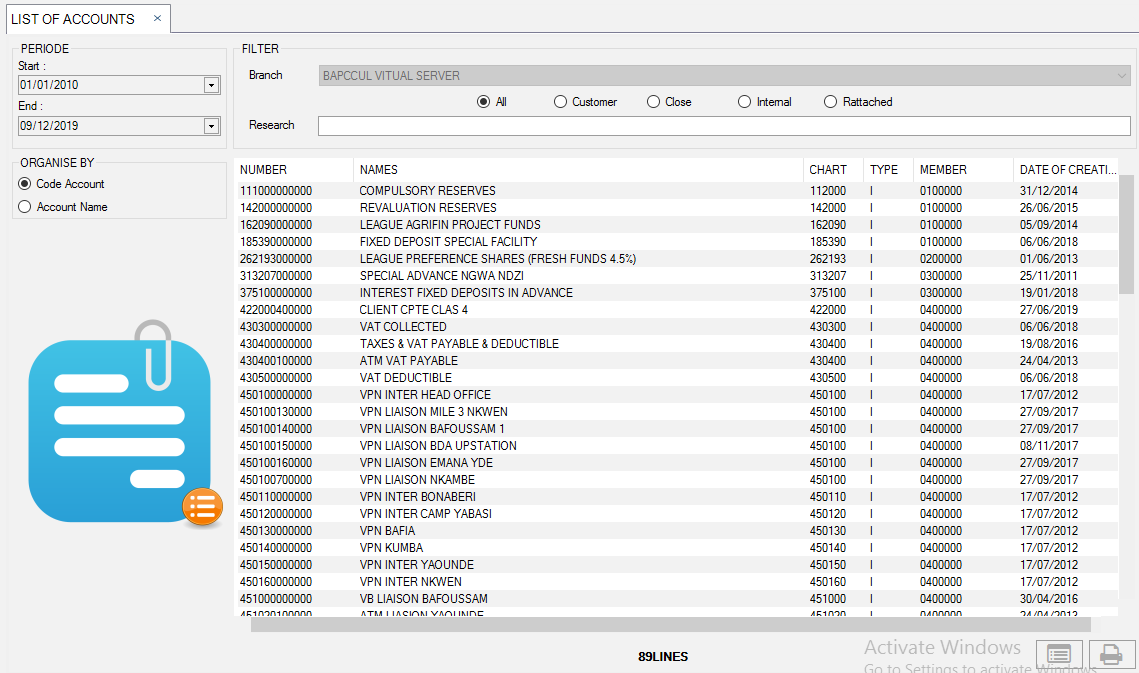
Accounts File
Function: Here, a user can get a list of Accounts based on when they were added or created in the system.Process:
Click on File on the menu, then click on Accounts File
Enter the Period start date
Enter the Period End date
NB: This dates marks when the client was created or added into the system. Select: organise By:
Account Code /Account Name
Select Branch. this is only possible if your user is of the Headquarter. or the Main / Principal Branch.
Search: you can also search the Account by name or code
Also filter the type of Account to be displayed, by selecting one of the following options:
All / Customer / Close / Internal / Rattached
Once the fields are entered, click on
to display the Account(s). Click on
to print
the list.
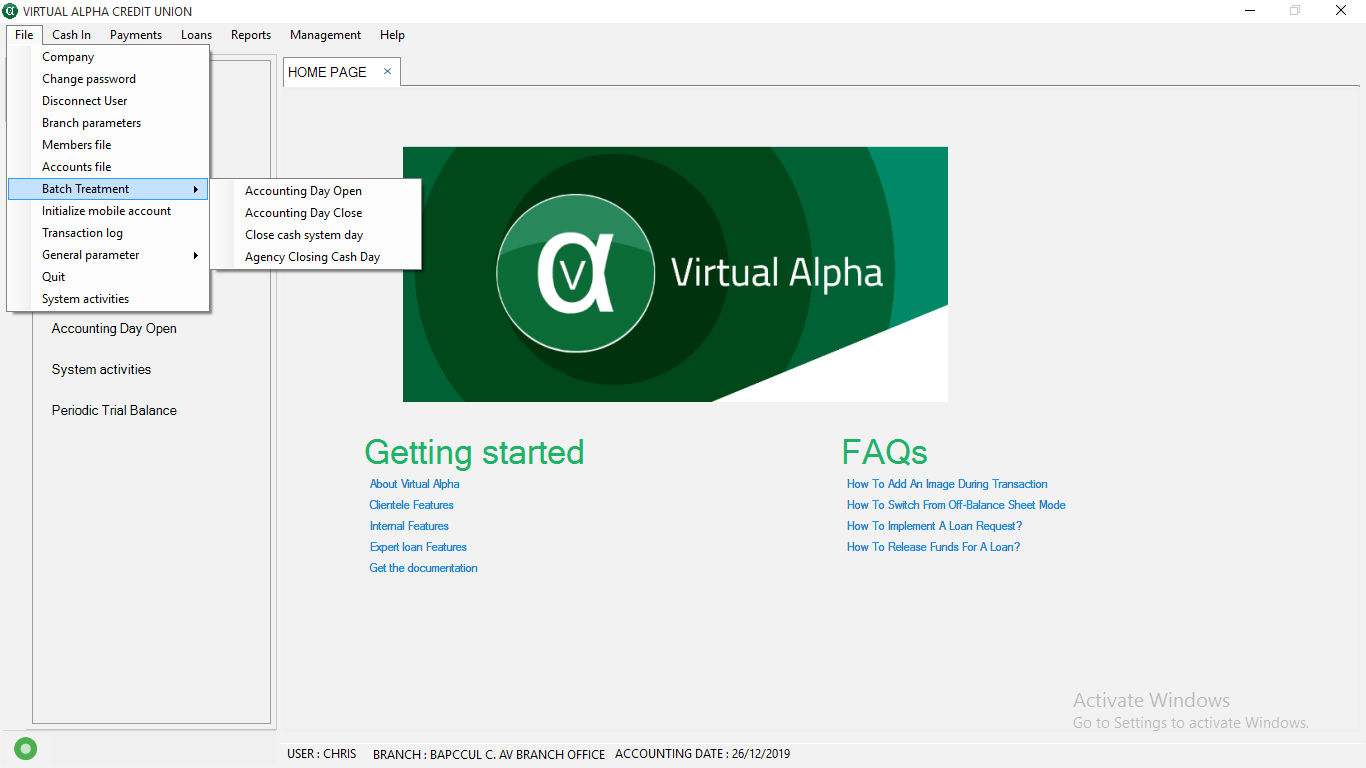
Batch Treatment
Function: This is where the Accounting day opening and closing are being managed Every single day.Note: Only a user from the Headquarters can perform the following tasks.
To access the Batch Treatment menu, click on File on the horizontal menu, then select from the sub-menu:
- Account Day Open
- Account Day Close
- Close Cash system Day
- Branch Closing Cash Day
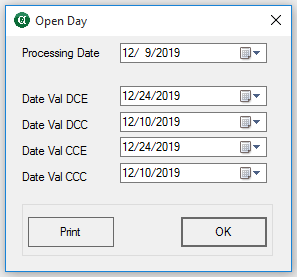
Account Day Open
Function: This is where the accounting dates is set for each Account type of the system.Simply enter the Processing Date then validate the form.
The right date will be automatically calculated for the rest of the "date fields":
- Savings Account Debit Date Value
- Current Account Debit Date Value
- Savings Account Credit Date Value
- Current Account Credit Date Value
Account Day Close
Function: This is where the accounting dates that were opened for all account types for their transactions, are closed and all transactions for that day completed.Once this sub-menu is clicked, it takes the Processing Date to its default and leaves it open for the next date to be set for the next day.
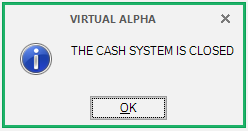
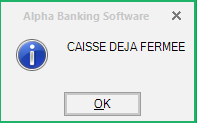
Close Cash System Day
Function: This is where the cash system for all the opened cash registers are being closed.NB: All the cash registers must be closed before coming to click on thi sub-menu. Once this sub-menu is clicked, it completes the closing of all the closed cash registers.
once clicked, a message is displayed:
Branch Closing Cash Day
Function: This is where the cash day for a branch is closed, after all the cash-desk for that branch have been closed.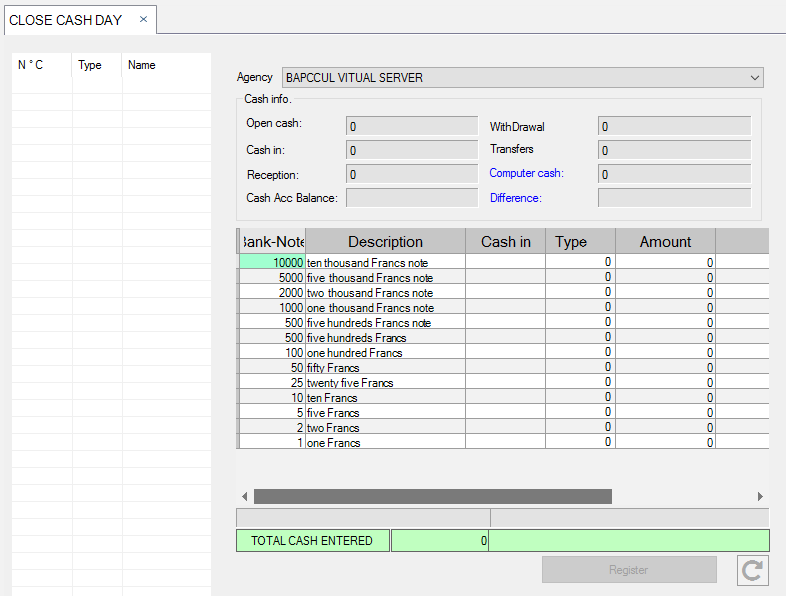
System Activities
Function: Here look-up all the activities that has been happening on the system or all the things done by the users.go to: File, then scroll to select System Activities
you can select the user code, to see the activities of a particular user
You can also select the start and end date to see activities within a specific period of time
You can also select check boxes, to see relatetd activities

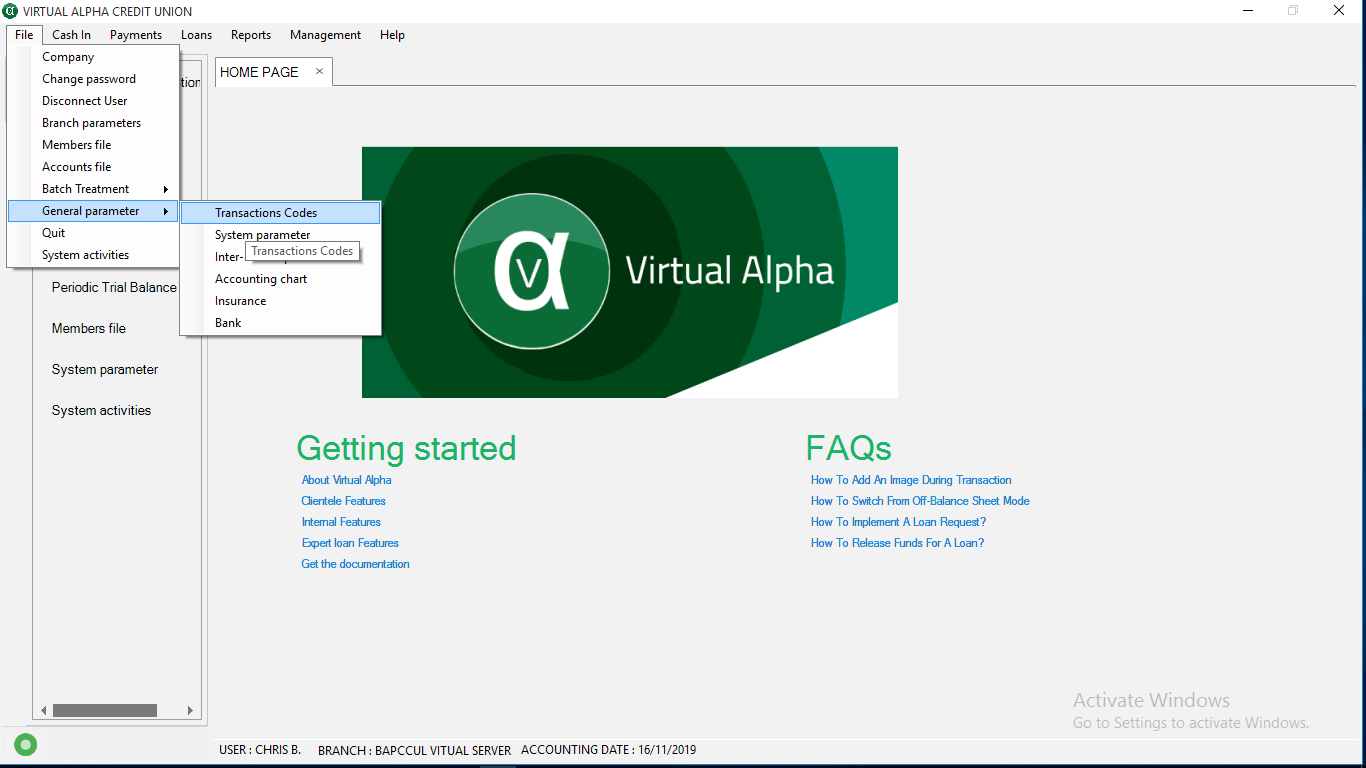
General Parameters
Function: This is where all the general configurations in the system is done.To access the General Parameters menu, click on File on the horizontal menu, then select from the sub-menu:
- Transaction Codes
- System Parameters
- Inter-Branch Parameters
- Charts of Accounts
- Insurance
- Bank
Transasction Code
Function: This is where the codes for the different types of transactions in the system are created.A list of all the already created transaction codes are displayed on the left-hand side of the view.
Enter all the fields and then click on Register.
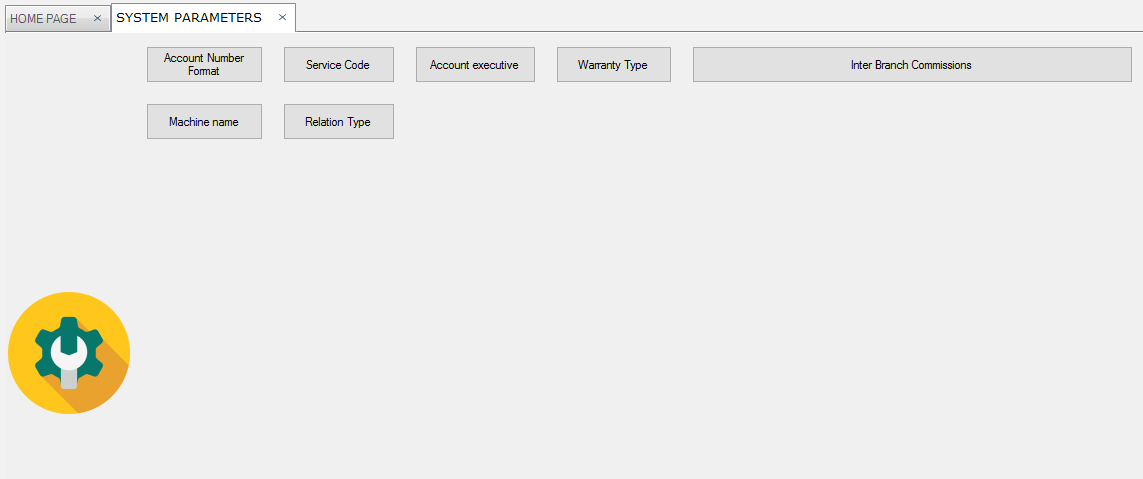
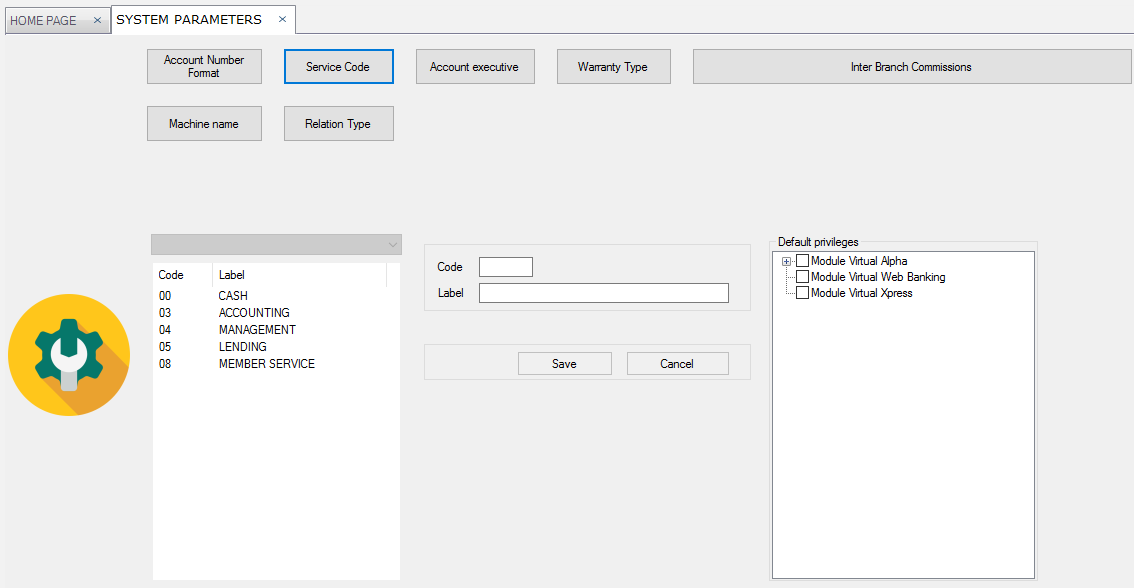
System Parameters
Function: This is where the different configurations of the system are made.This page allows a user to do configurations on the following:
- Account Number Format
- Service Code
- Account Executive
- Warranty Type
- Inter-Branch Commissions
- Machine Name
- Relation Type
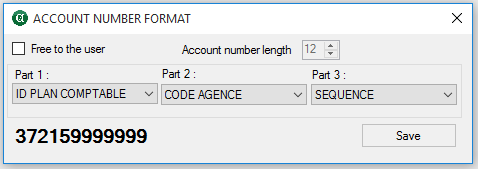
1. Account Number Format
Function: This is where the cash day for a branch is closed, after all the cash-desk for that branch have been closed.Click on the Account Number format tab, to access it.
The Account Number Format is in 3 parts, click each drop-down to decide what should be used in each part.
Check the box Free to the User: This will allow the user to enter the Account Number how ever they please, else they will have to folow the format set on this window.
Click on the Save buton, once you are done with the configuration.
2. Service Code
Function: This is where services in the system ate creayed and privillages or access rights are given to each service as required.Click on the Service Code tab, to access it.
Enter the Code and the Label, then select the privillages from the list of default privillages on the right-hand side.
All existing or already created services are displayed on the left-hand side.
Once you've entered all the required information, clcik on the Save button.
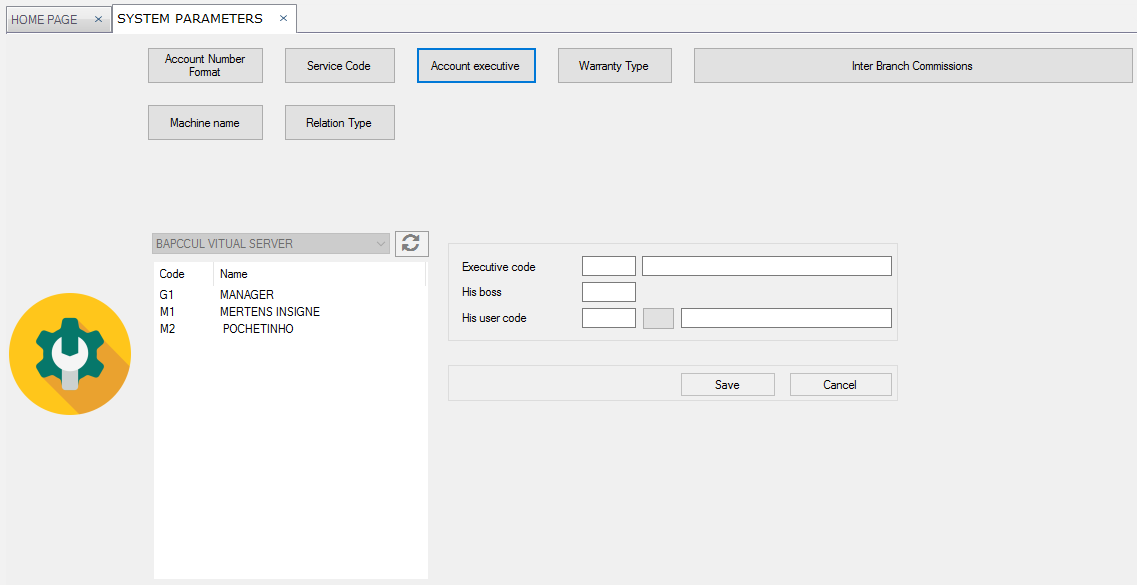
3. Account Executive
Function: This is where a Branch executive/manager is created and his boss (the person to manage him/her) is also created or added.Click on the Account Executive tab, to access it.
Enter the Executive code and his/her name
Enter the Boss's Code and his/her name
Once you've entered all the required information, clcik on the Save button.
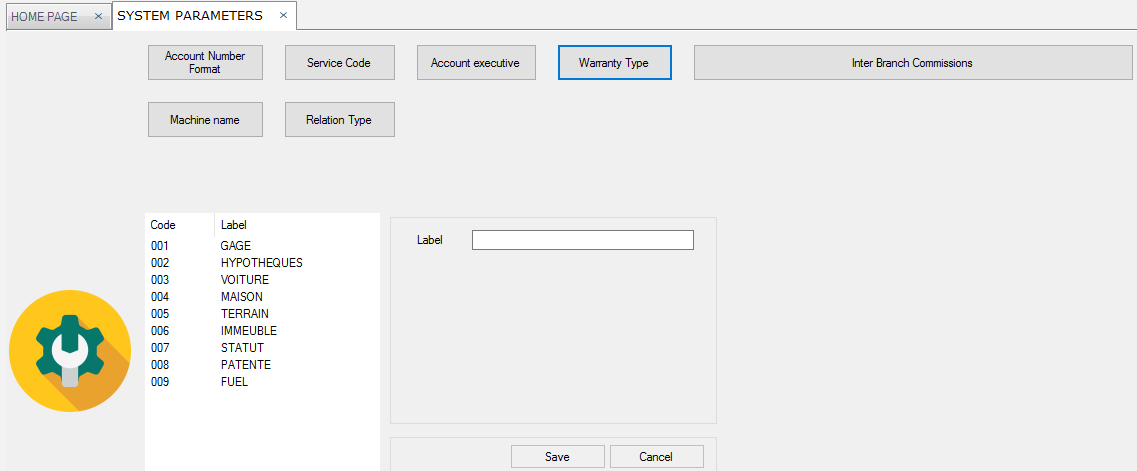
4. Warranty Type
Function: This is where a new Warranty or guaranntee type is createdClick on the Warranty Type tab, to access it.
Enter the Label
clcik on the Save button.
The list of already created Warranty type is displayed on the left-hand side
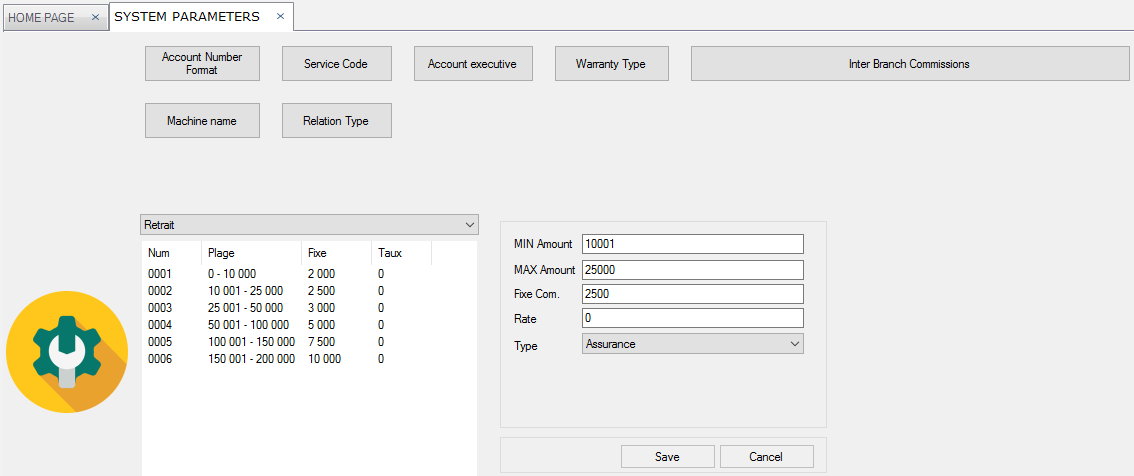
5. Inter-Btanch Commissions
Function: This is where Commissions are created for the different sense of transactions ( Withdrawal / Deposit / Transfer / Insurance).Click on the Inter-Btanch Commissions tab, to access it.
To view all created commissions, Select the transaction sense from the dropdown on the top of the list on the left-hand side
Enter the Min Amount
Enter the Max Amount
Enter the Fixed Commission
Enter the Rate
Select the transaction sense or type from the dropdown
Once you've entered all the required information, clcik on the Save button.
6. Machine Name
NB: Go to Installation to see details..
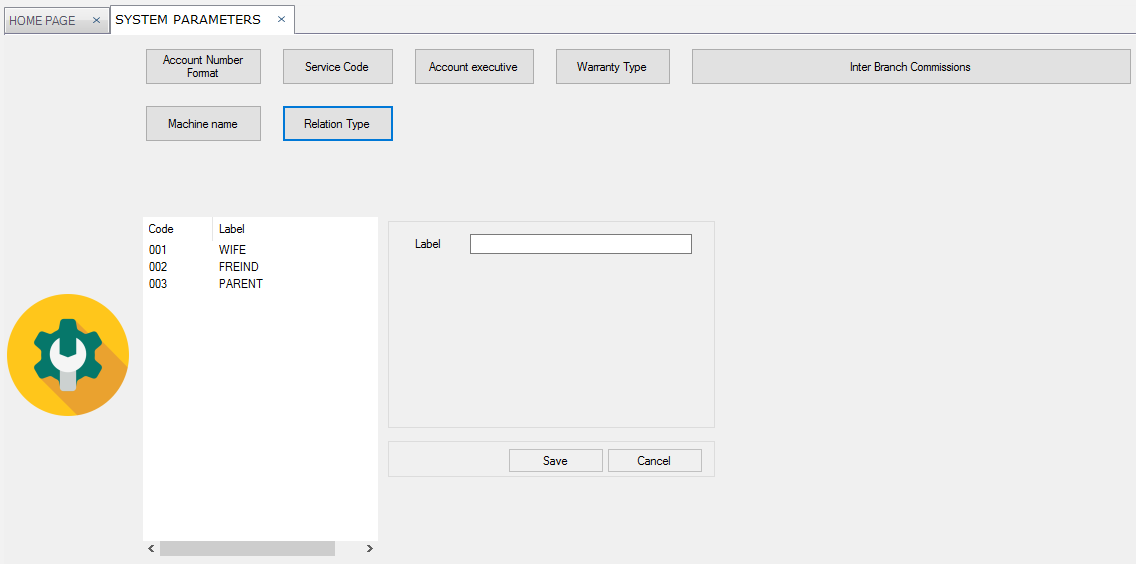
7. Relation Type
Function: This is where relations of any type are added to the system.Click on the Relation Type tab, to access it.
A list of all relations are displayed on the left-hand side
Enter the Label
clcik on the Save button.
Inter-Branch Parameters
Function: This is where Commissions for transactions between Branches are configuredEnter the values for payment, wihdrawal, transfer and insurance Commisions
Enter the Accounts to receive each of the commissions
clcik on the
button, to save. 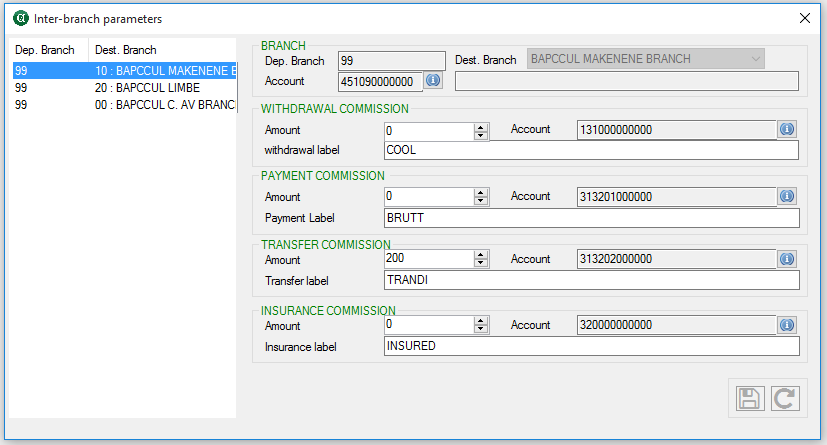
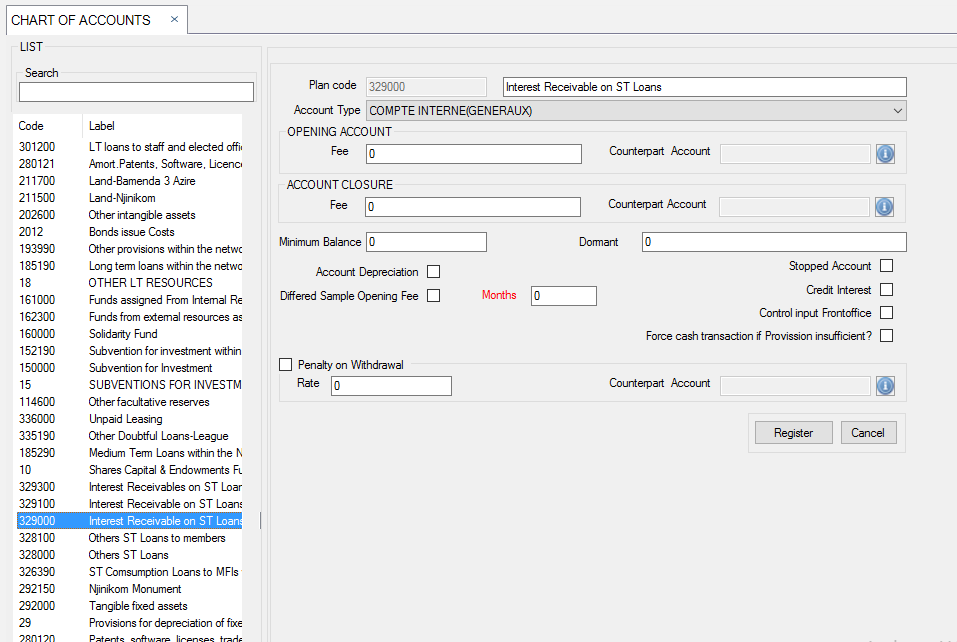
Accounting Charts
Function: This is where Charts of accounts are created.A list of all created accounts are dicplayed on the lefy-hand side
Enter all the fields as required
clcik on the Register button, to save.
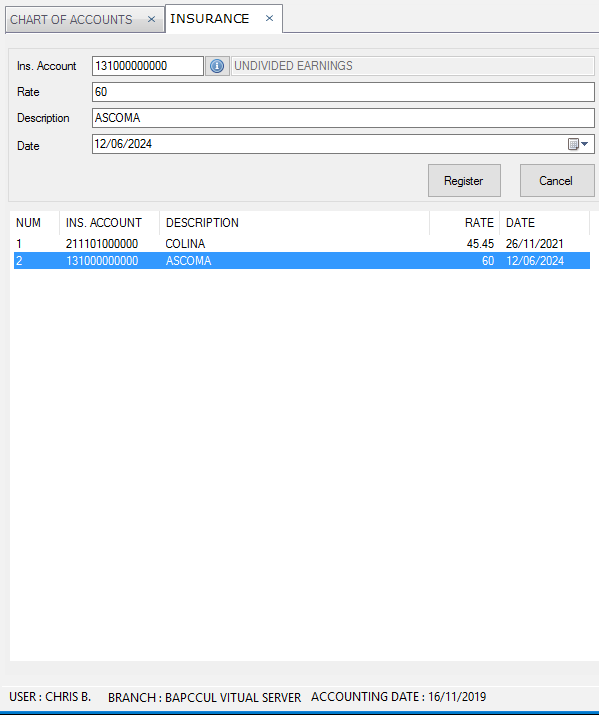
Insurance
Function: This is where insurance is configured in the system.A list of all created insurance are dicplayed below the form.
Enter all the fields as required
clcik on the Register button, to save.
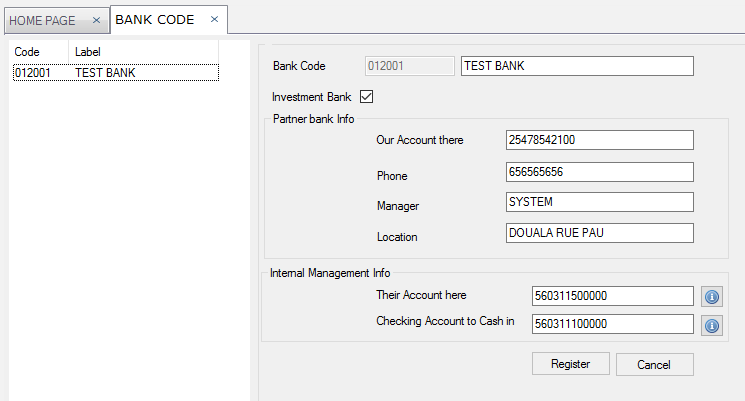
Banks
Function: This is where Banks and their accounts are created in the system.A list of all created Banks are dicplayed on the lefy-hand side.
Enter all the fields as required
clcik on the Register button, to save.
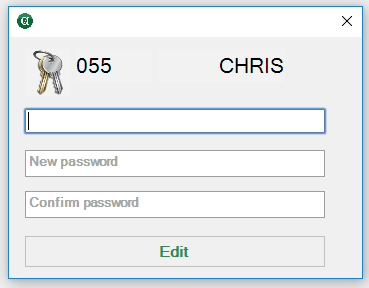
Change Password
Function: Here we can change the Password for our own user in the system. go to: File, then scroll to select Change PasswordEnter the Old Password
Enter the New Password
Confirm the new password
Then click on Edit to complete the process.
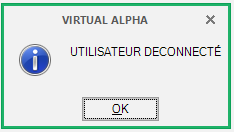
Disconnect User
Function: Here a logged-in user can disconnect another user in the system. go to: File, then scroll to select Disconnect UserSelect the user to disconnect
Click on the Disconnect user button
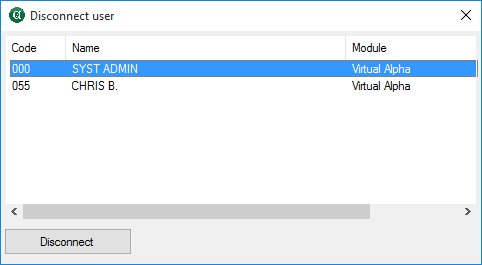
Once the user is disconnected, a message is displayed.
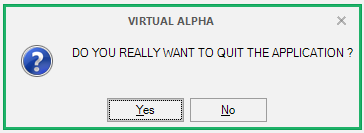
Quit Application
Function: This is where a logged-in user can quit the application. go to: File, then scroll to select QuitOnce you clcik on quit, a message is displayed
Click on Yes button to quit or on No to stay logged-in
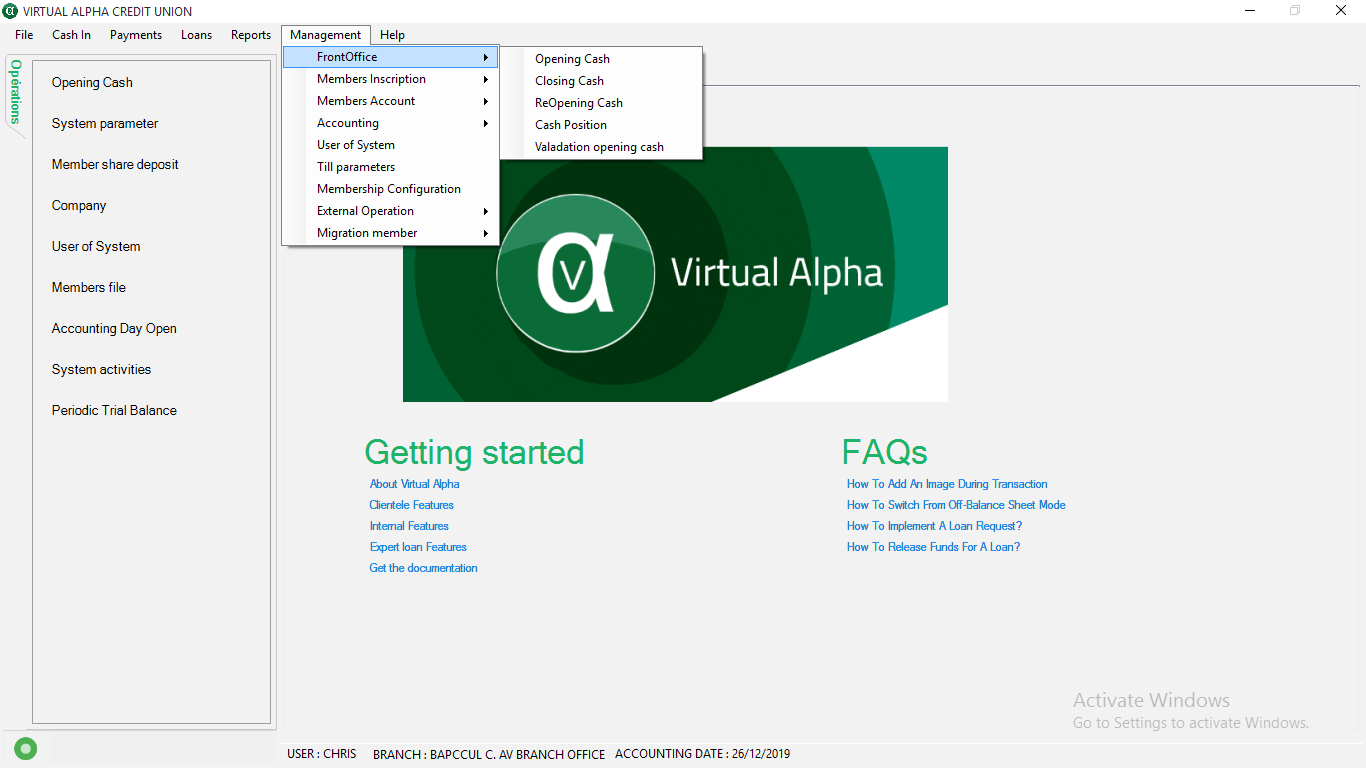
Management
This menu contains Front Office, Back Office and Maintenece operations.
Front Office
Function: This is where every activity that has to do with the member at the cash register
is being carried out.
The following is done in the front Office :
- Opening Cash
- Closing Cash
- Re-opening Cash
- Cash Position
- Opening Cash Validation
1. Opening Cash
Function:This is where the Cash Register/ cash-Desk is opened, at the start or begining of the day, to mark the start of the accounting day. go to: Managemenet, hover on Front Office and select Opening CashNote: The cash left for the previous day is automatically entered by the system
Then click on

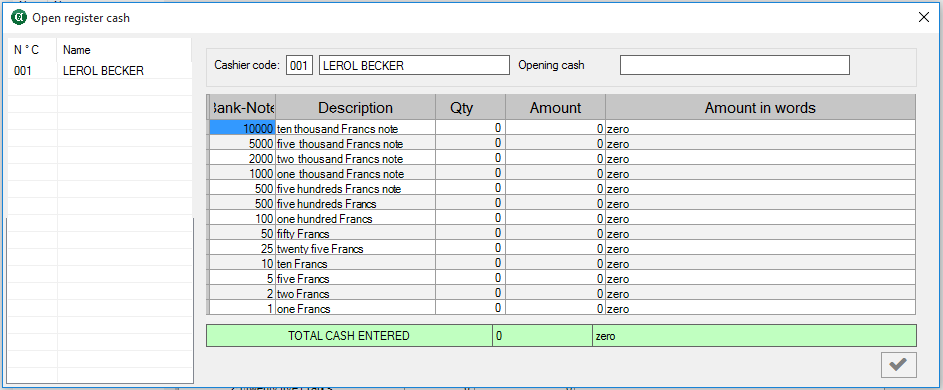
Once the cash desk is opened and awaiting validation, a scucess message is displayed.
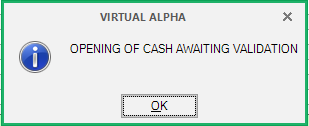
Once the user clicks on ok on the message, the report for the cash closing is initialized and displayed automatically.

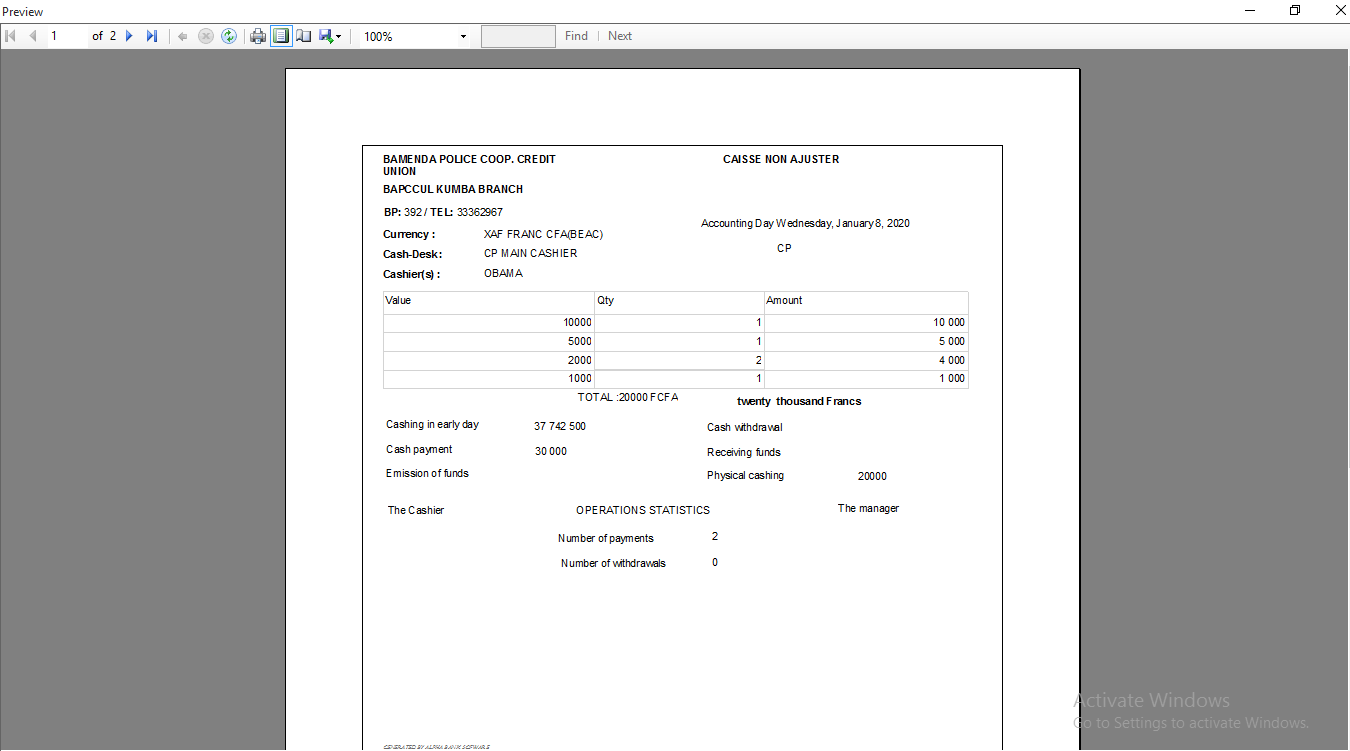
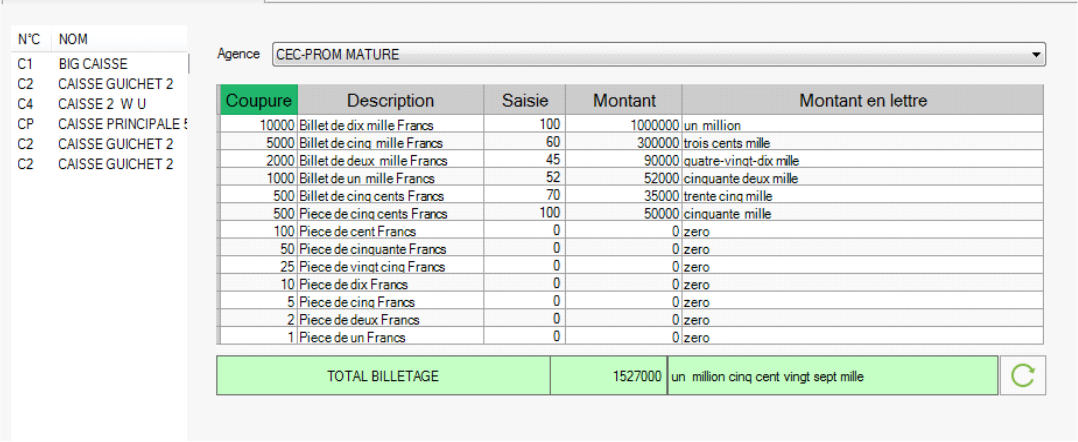
2. Closing Cash
Function:This is where the Cash Register/ cash-Desk is closed, at the end of that day, to mark the end of the accounting day. go to: Managemenet, hover on Front Office and select Closing CashEnter the the amount available in hand for each type of Bank-Note
Then click on

Note: If the Cash at hand is different from the cash in the system, a message is displayed. you can shoose to continue or cancel the process and enter the right cash.
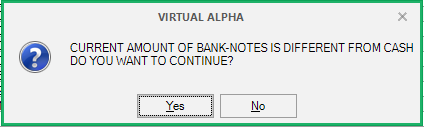
Once the cash desk is closed, a scucess message is displayed.
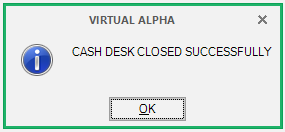
Once the user clicks on ok on the message, the report for the cash closing is initialized and displayed automatically.
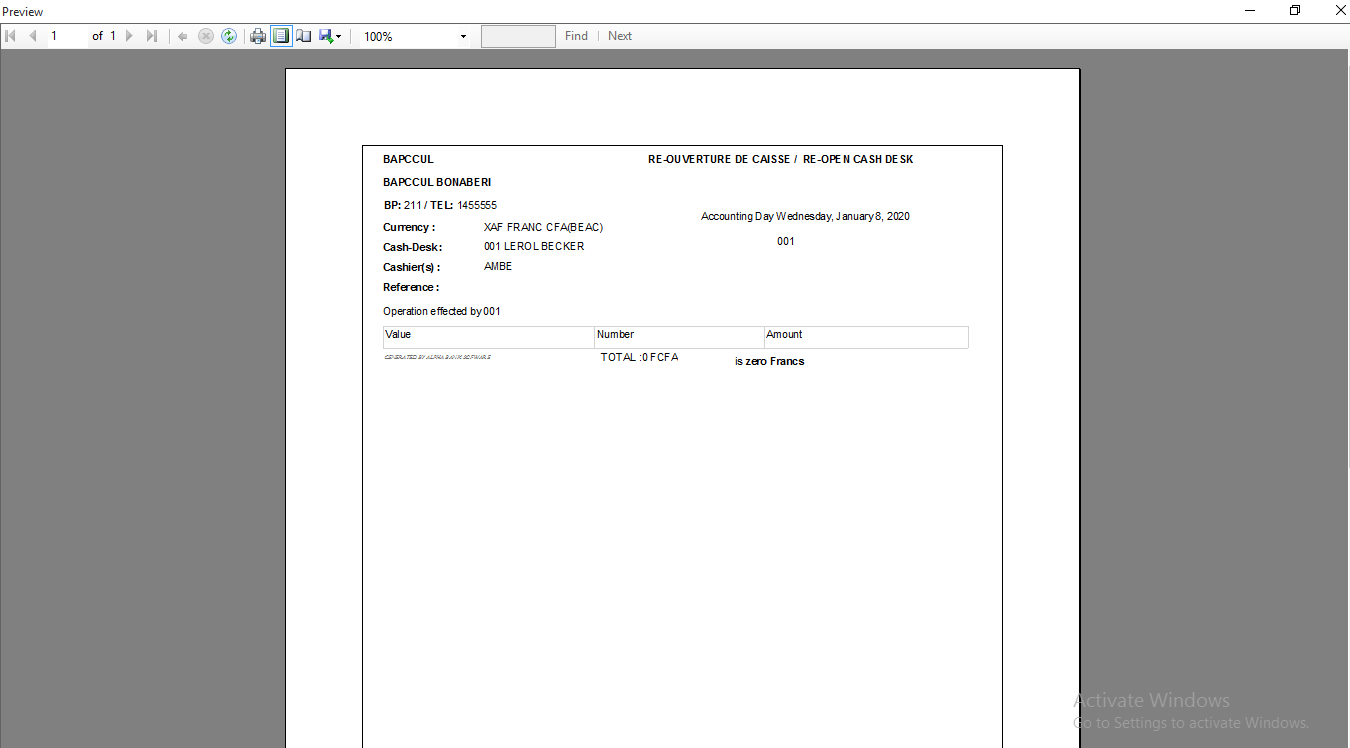
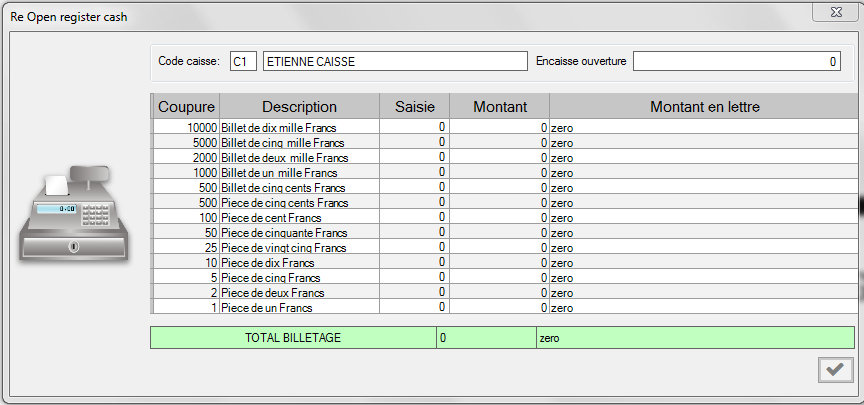
3. Re-Opening Cash
Function:This is where the Cash Register/ cash-Desk is re-opened, at the day, when the cash-desk was closed, but has not been closed at the headquarters, to mark the end of the accounting day. go to: Managemenet, hover on Front Office and select Re-opening CashClick on
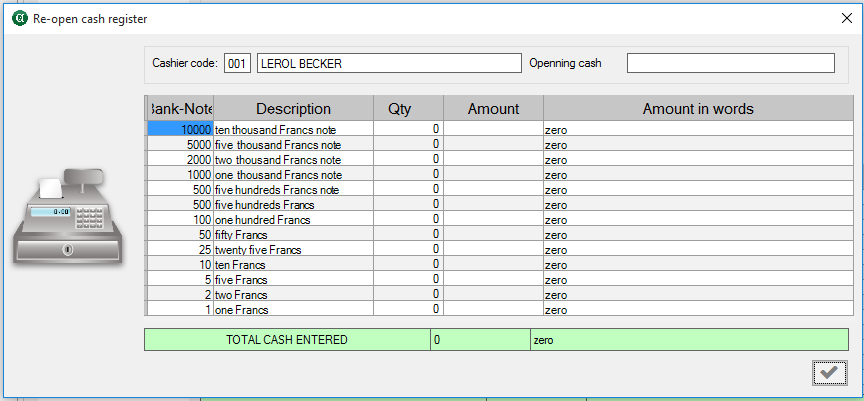
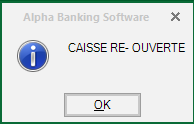
Once the cash desk is re-opened, a scucess message is displayed.
Once the user clicks on ok on the message, the report for the cash closing is initialized and displayed automatically.
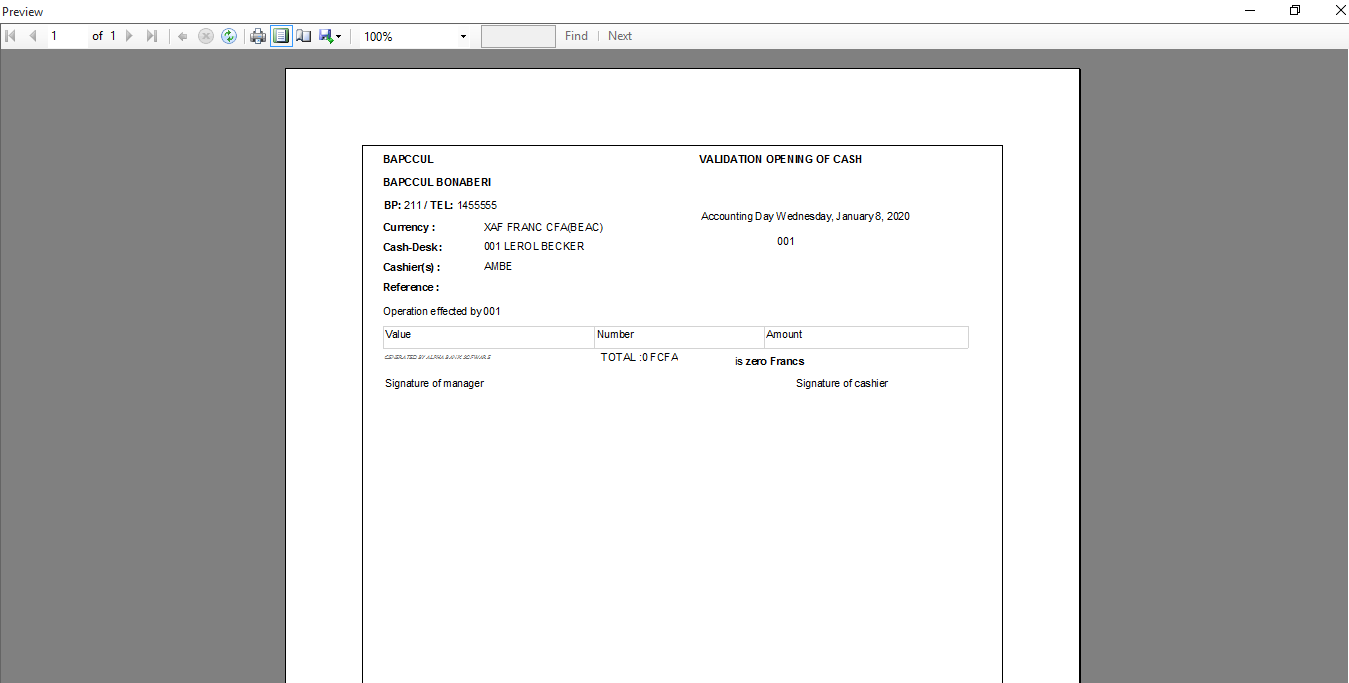
4. Opening Cash Validation
Function: This is where the Cash Register/ cash-Desk is validated, before it can be used for transaction.Once validated, a Cashier can go on to start serving clients.
The cash-desk validation is done by the person incharge of opening the Main/Principal Cash-Desk. go to: Managemenet, hover on Front Office and select validation opening Cash
Select a cash desk and Click on
to validate it.
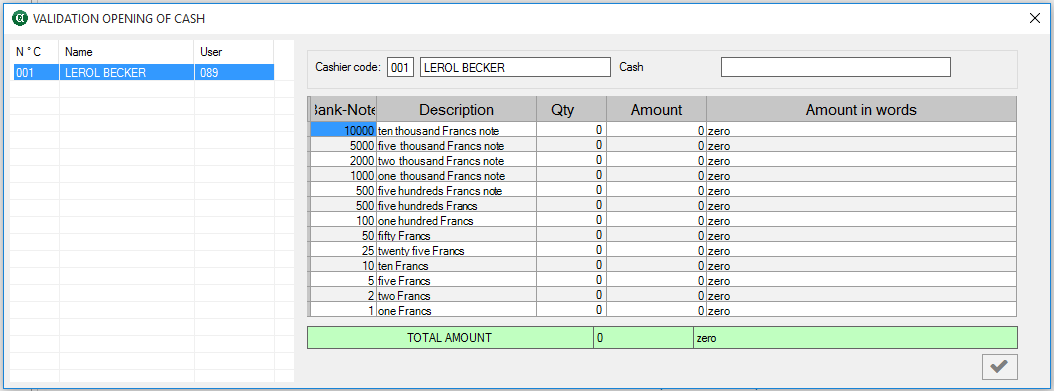
Once the cash desk opening is validated, a scucess message is displayed.
Once the user clicks on ok on the message, the report for the cash closing is initialized and displayed automatically.
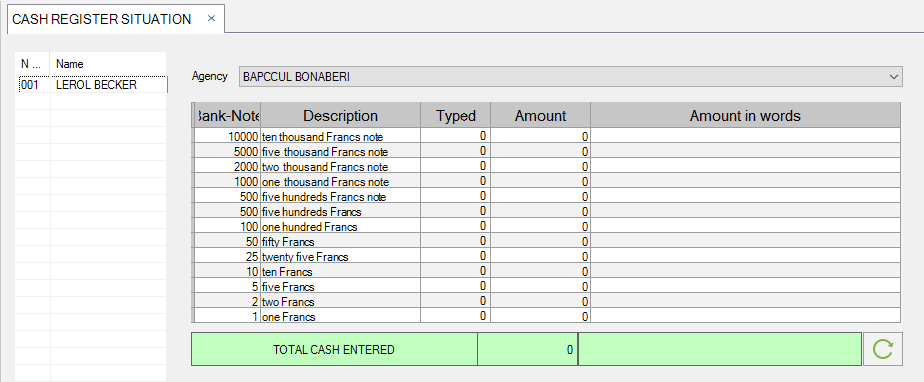
5. Cash Register Situation
Function: This is where the actual situation of a Cash Register is being observed, to know the ampunt or number of notes available in the cash register.To see the situation of a cash register in the ssytem:
Go to: Managemenet, hover on Front Office and select Cash Position
1. Select a Branch from the dropdown.
2. Select a cas register from the list of open cash registers on the left-hand side.
3. clcik on
 in order to refresh and see the updated cash situation.
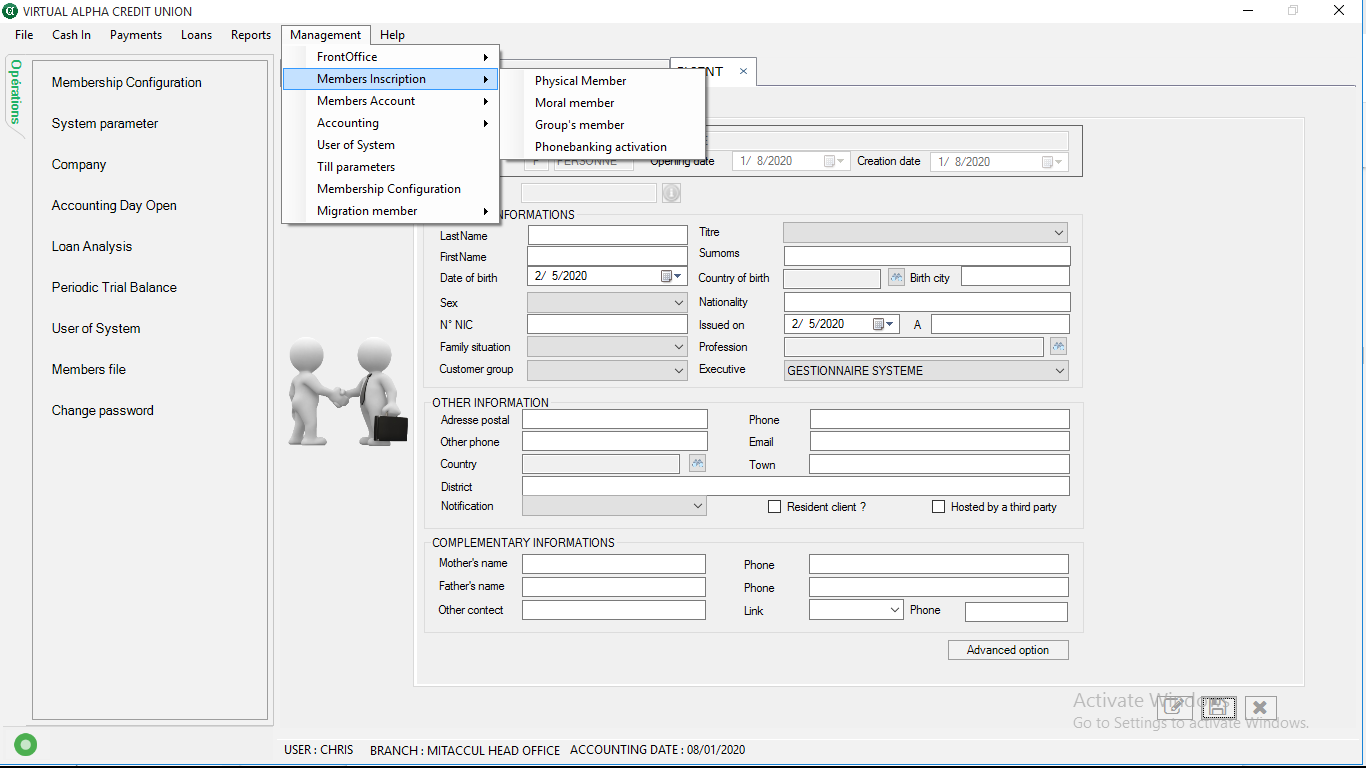
Member (Registration) Inscription
Function: This is where every member is registered in the system,
before theycan perform any transactions.
The following types of members can be created:
- Physical Members
- Moral Members
- Group Members
- Phone-Banking Activation
Accounting
Function: This is where every activity concerned with accounting
is being carried out.
The following is done in Accounting:
- Journal
- Transfer Account to Account
- Journal Validation
- Return of Funds
- Regular transfer validation
- Installing Regular Transfer
- Validation of Account to Account Transfer
- Banking Transfer
- Branch Funds Request
- Validate Branch Funds Request
- Funds Received from Head Office
- Entry / Exit of Funds
1. Journal
Function: This is where all journal transactions are entered into the system.Go to: Managemenet, hover on Accounting and select Cash Position
The journal transaction can either be in Balance sheet mode or Off-Balance sheet
Balance sheet mode: This involves making transactions while taking in consideration accounts with types of account different from Engagement (E-type) of account and charts of account that have their code begining with 9.
Off-Balance sheet mode: This involves making transactions while taking in consideration accounts with types of account different from Engagement (E-type) of account and charts of account whose codes begining with any number EXCEPT 9
Once on the journal view, slect the type of mode with which you want to make a transaction or journal entry.
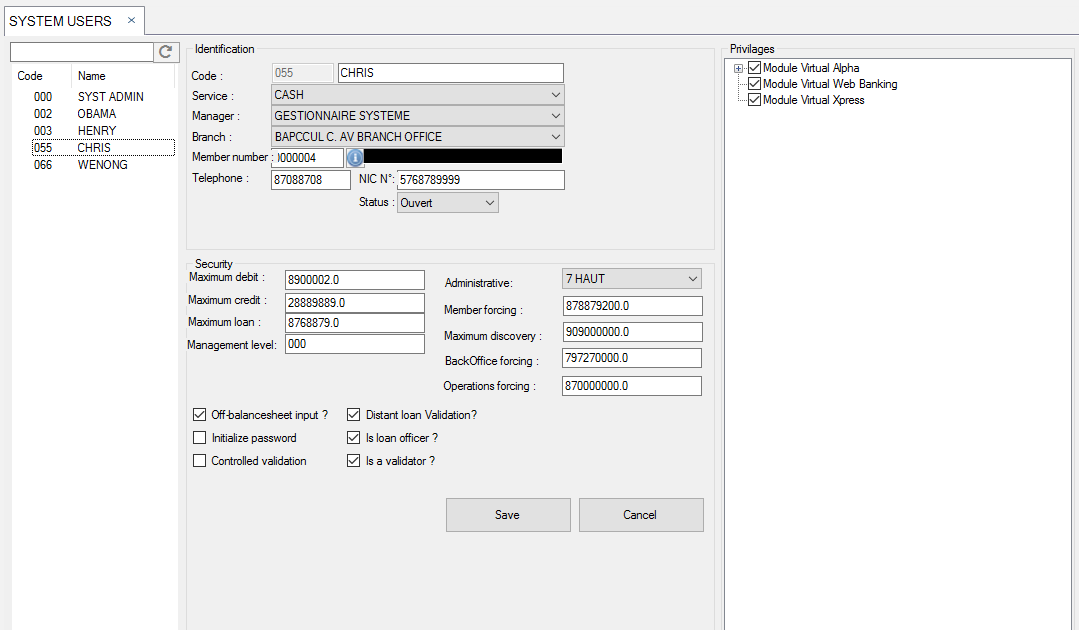
User of System
Function: This is where a new user is created for the system. Roles are given
in the privillage column on the right-hand side.
NB:
1. users are given Management level, which determines weather or Not the user is of
the HeadOffice.
2. Only headoffice users can Open the Accounting Day
2. All fields in this form is required.
Till Parameters
Function: This is where a cash register is created for a Branch in the Enterprise
Enter all the required fields and click on the Register button.
NB: The cash-table is to be left empty.

On the creation of the new cash desk is complete, a success message is displayed;

Membership Configurations
Function: This is where parameters for configurations are made so that they can be used
when creating an account for a member.
Click on the info button to select the
Enter the Transaction label
Enter the amount
Then click on the save button on the side.
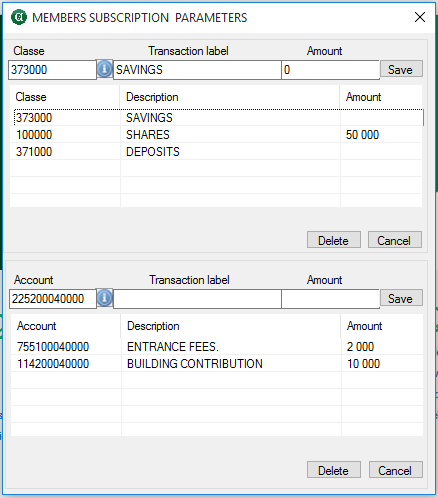
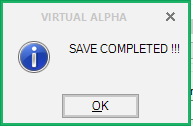
Once the member subscription is saved successfully, a message is displayed:
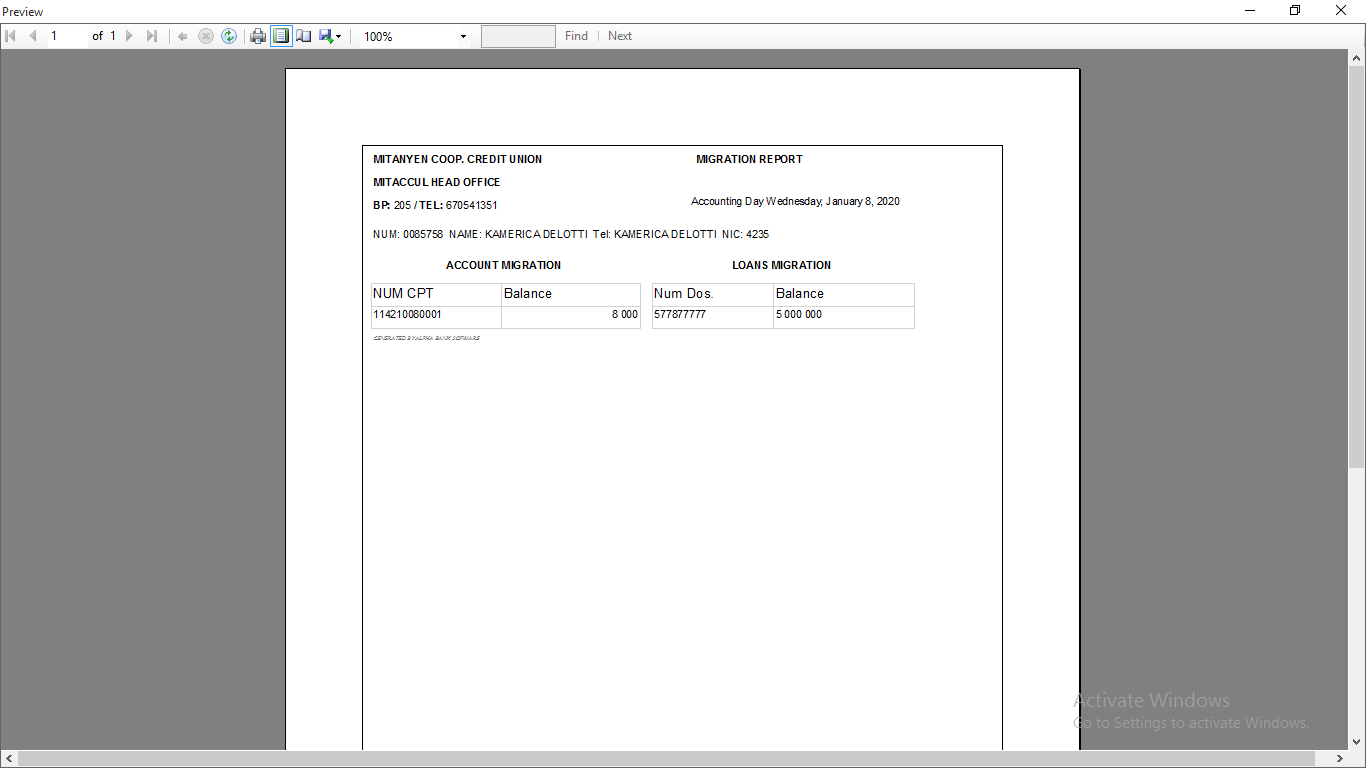
Migration Members
1. Moral Member Registration
Function: This is where members (Company or an Enterprise) that are moving from the controlled Alpha platform, into the virtual platform are being registered. NB:Moral members means the member is NOT a physical person, but a Company or an Enterprise.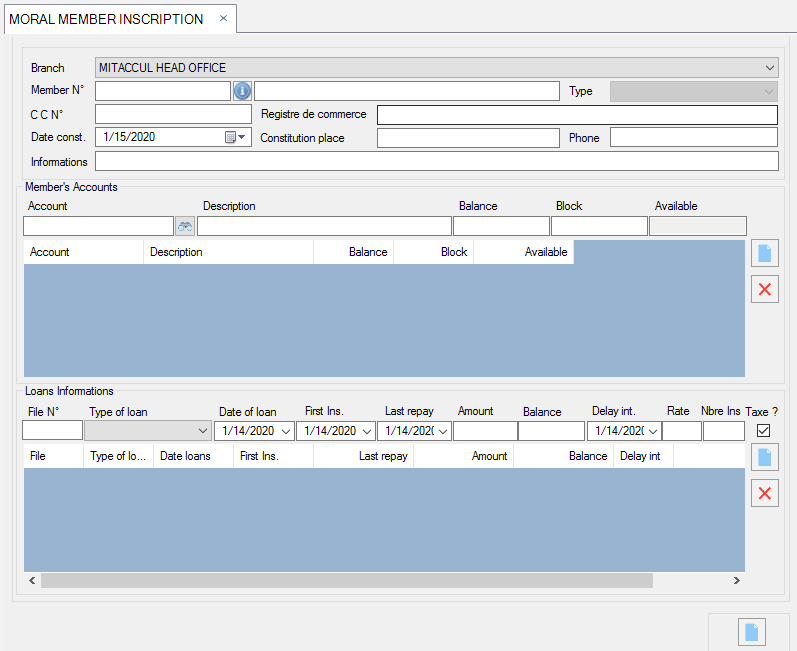
Once the registration is sccessfully done for a member, a migration report can be printed as seen below:
2. Physical Member Registration
Function: This is where members that are moving from the controlled Alpha platform, into the virtual platform are being registered.NB:physical members means the member is a physical person
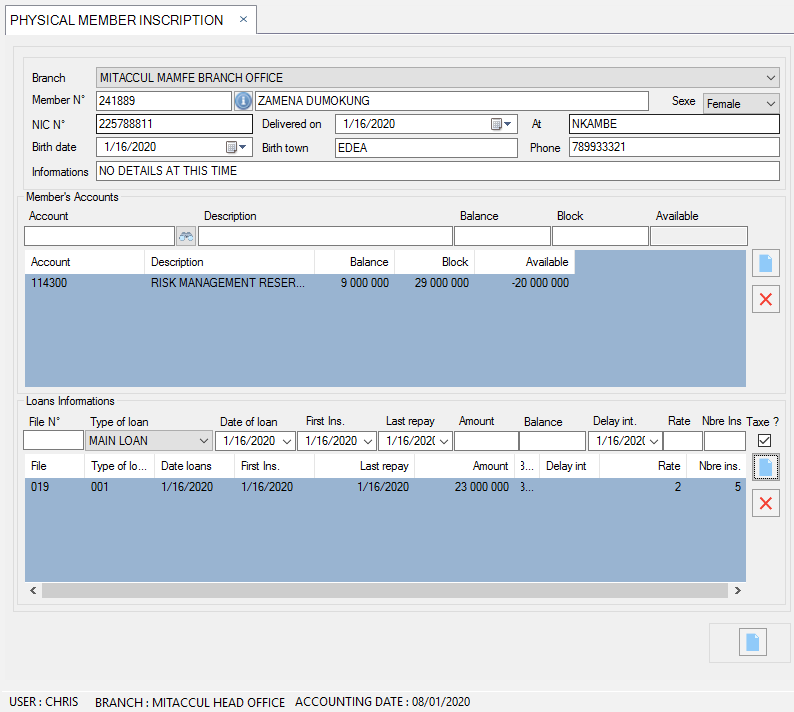
Once the registration is sccessfully done for a member, a migration report can be printed as seen below:
Cash In
This menu includes all the operations done at the Cash Desk infront of the
client.
This menu item has the following sub-menu:
- Cash From a Member
- Member Share Deposit
- Reception of Funds
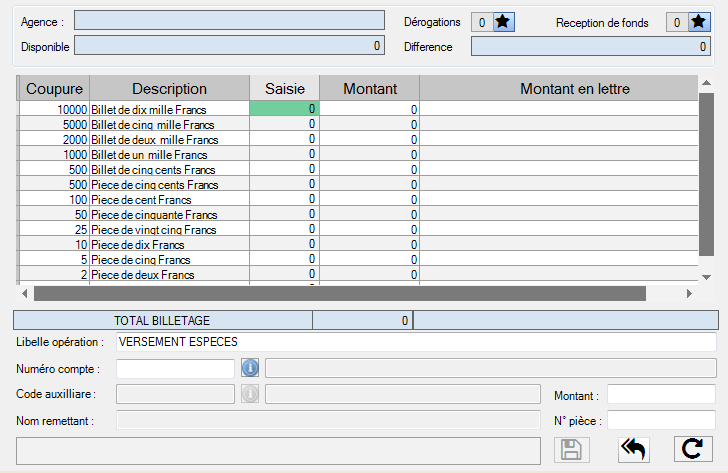
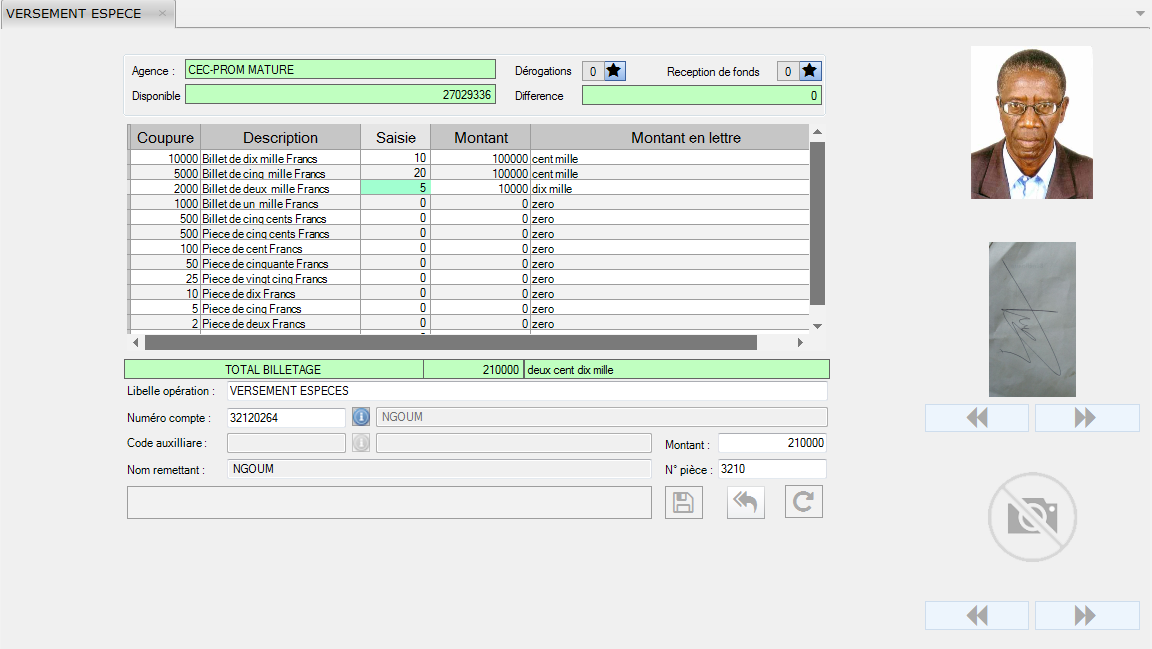
Cash From a Member
Function This form makes it possible to make payments in the
account of the customer who immediately credits it.
It is as follows:
To properly fill this form:
Select the Branch, in case your user is of the headquarter,
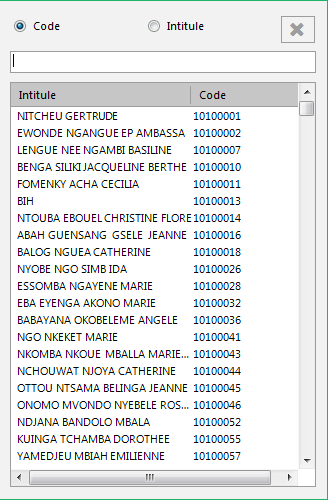
Enter the memeber's code or click on  to get a list of members, then select the required member.
Once a member is selected, a list of the member's account is displayed below.
Enter the Reference fo the transaction
On the left-side of the form, enter the qty or amount of each Note from the member.
Enter the Amount on the required account from the list of displayed accounts.
You can also add an internal account in case the client need a transaction from the cash-desk.
To do this, click on below the
Bank-notes.
A window is displayed.

Enter the transaction amounts on the right-side as seen above.
Verify that the Difference below is 0.
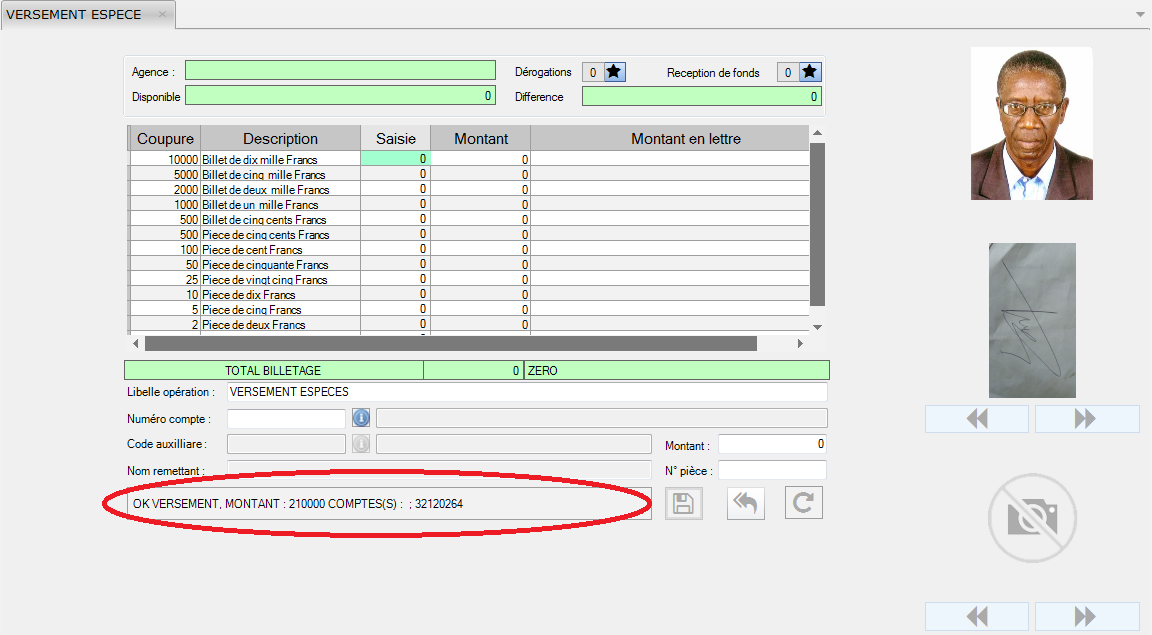
Once everything is entered, clcik on
to complete the process, and save the changes.
You can also click on  to provide cash change to the client.
As follows:
Enter the change QTY on the amount of the exact Note you are giving out as change.
once you are done, click on save button.
A message is displayed :
Front Office
The FrontOffice includes the main operations carried out within the microfinance.
To access this menu,
go to the Treatment »FrontOffice
menu.
The latter includes the following elements:
- Cashier opening
- Cash reactivation
- Cash closure
- Cash payment
- Cash withdrawal
- Background issue
- Background reception
- External fund deposit
- Collector fund outlet
Front Office: Cash Opening
To access this menu, go to the menu Treatment »FrontOffice»
As its name indicates, this card allows you to open the cash register at the
beginning of the day. The cash register form is as follows:
To open the Cash desk, select the name of the cash desk user.
The Bank-Notes of the Cash desk box displays the amount held in the cash
desk.
Click on " ".
The following dialog box appears :
".
The following dialog box appears :
Note:
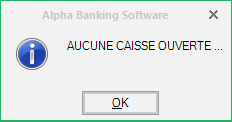
If no cash desk has been opened, the following message is displayed:
If the cash desk has already been opened, the following message is displayed:

Front Office: Cash Desk Reactivation
This view allows you to reactivate a fund that has already been closed by
a user.
It is important to note that only the user who has closed the checkout can
reactivate it.
Click on ""
to reactivate the cash register. A dialog box appears:
Front Office: Cash Payment
This form makes it possible to make payments in the account of the
customer who immediately credits it.
It is as follows:
The user enters the account number first.
He enters the account
number or
click on " ",
after which he brings the cursor into the code field and clicks the enter
key.
",
after which he brings the cursor into the code field and clicks the enter
key.
The following box appears:
Selects the account number by double-clicking on it.
If the number of digits of the entered account number is insufficient or
exceeds,
The error message below is displayed:

If the account number entered is wrong,
the following error message
is displayed:

Once the Account Number is entered or selected, the system automatically
generates
information about the account holder,
namely:
- His/her Name
- Available funds in this Account
- The number of operations in derogation: which is the process of
returning an
operation when the latter is refused or is a failure. It may happen that
the customer makes a payment over the limits (click on
 and select this number)
 - The number of fund receipts performed. This allows the automatic receipt
of
funds between the different boxes physical intervention of the
user.(click on
and select this number)
- The auxiliary code
- The name of the remitter
- The identification image and signature of the Account holder.
After having entered this information, he/she enters:
-the series, -the amount of the payment,
-the number of the coin and
carries out the ticketing (the total of this ticketing is automatically displayed at the bottom as well as the difference at the top right).
The system will credit the account chosen by the user of the sum entered.
To return to the entry, click on
 and
and  to cancel the operation.
 To save the payment, click on

The following card will appear:

Note: This Circle (field) indicates that the payment has been carried out successfully, as well as the "Amount paid" and "Account Number"
Front Office: Withdrawal
This form makes it possible to make withdrawals in the account of the
customer
who immediately debit it.
This form is as follows:
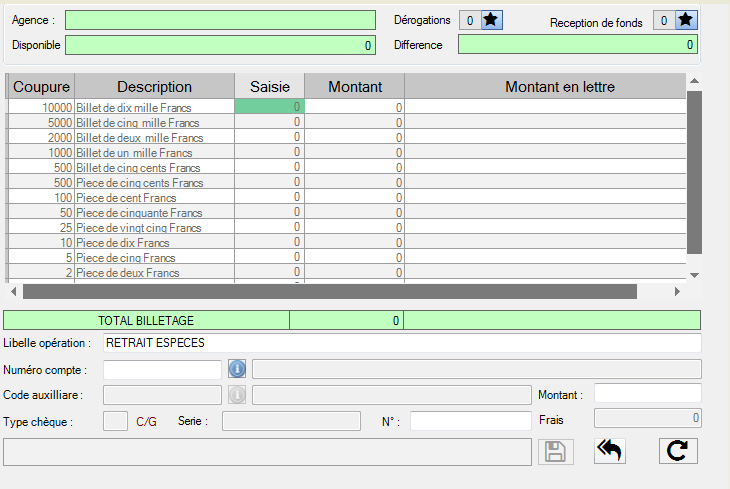
The user first enters the Account Number.
He enters the account
number or
click on ;
after which he brings the cursor into the code field and clicks the enter
key.
The following box appears:

Select the account number by double-clicking on it.
If the number of digits of the entered account number is insufficient or
exceeds,
the error message below is displayed:
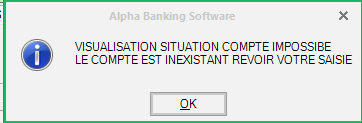
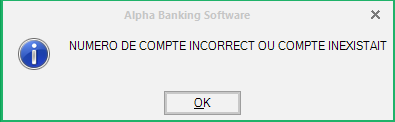
If the account number entered is wrong,
the following error message is
displayed:
Once the account number is entered or selected, the system automatically
generates
information about the account holder,
namely:
- His/her name
- The funds available in this Account
- The number of operations in derogation which is the process of returning
an operation when the latter is refused or is a failure. It may happen
that the customer makes a withdrawal greater than the amount in his
account.
(click on
and select this number)
- The number of received funds (click on
and select this number),
- The auxiliary code
- The name of the Depositor (remitter)
- The identification image and signature of the Account holder.
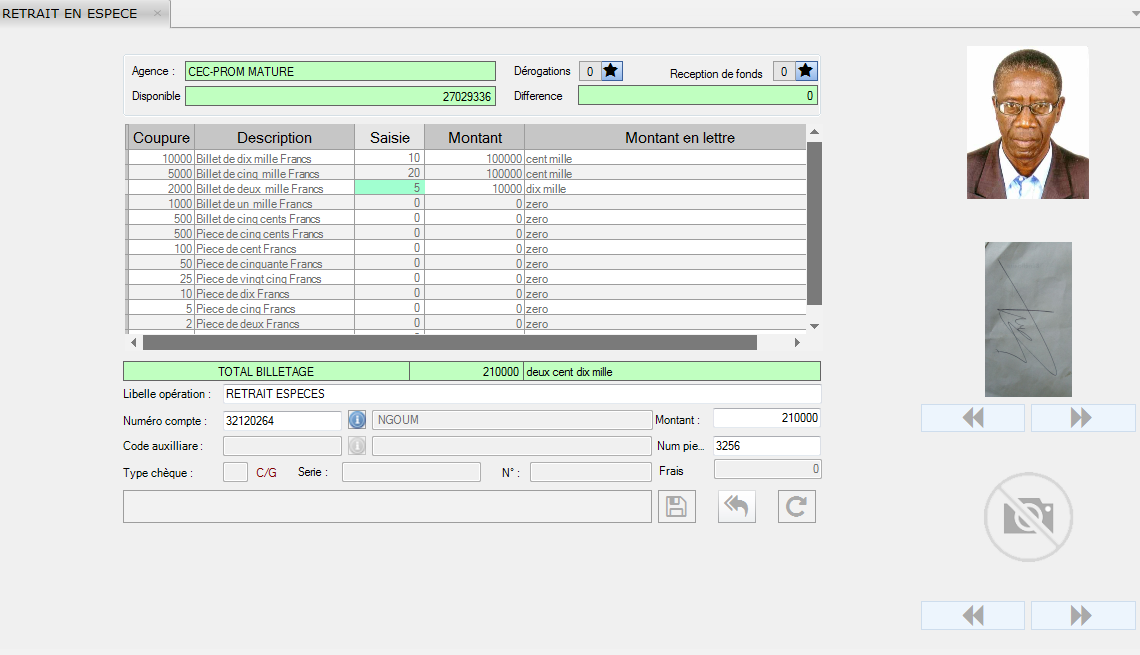
After having entered this information, he/she enters
-the series,
-the amount of the payment,
the number of the coin and
-carries out the ticketing (the total of this ticketing is automatically displayed at the bottom as well as the difference at the top right).
The system will debit the account selected by the user with the sum entered.
To return to the entry, click on
and Clcik on
to cancel the operation. To save the payment, click on
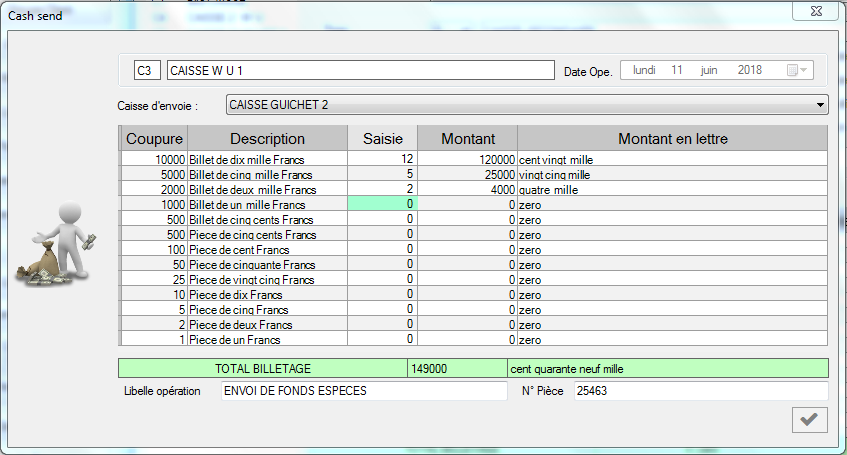
Front Office: Fund Transfer (Sending)
This form allows funds to be transferred from one cash desk to another
that does not have one.
NB: The credit union must hold a minimum of funds
necessary for the issue.

The user performs the ticketing, between the transaction name and the part
number
and clicks .
The system immediately performs the operation.
Front Office: Fund Transfer (Receiving)
This form allows transfered funds (funds sent), to be received by another
cash-desk.
NB: It is important to note that this receipt is only
possible
if the cash-desk requiring the funds must have a balance lower than the
minimum balance that a cash-desk must hold.
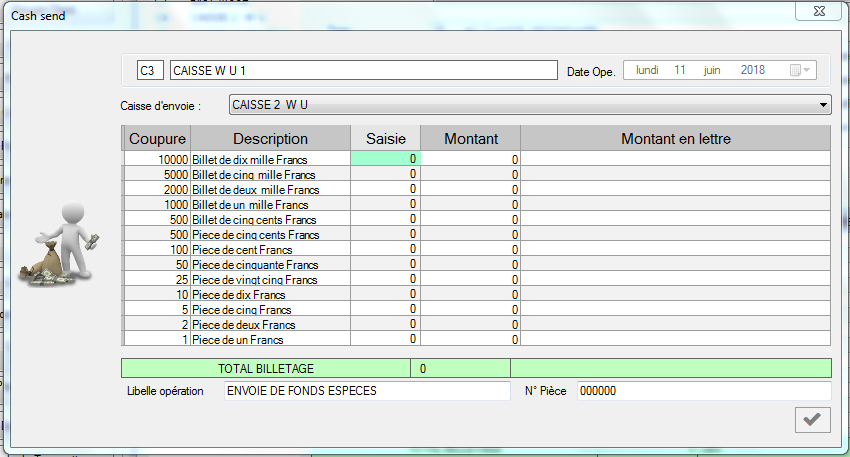
The user performs the ticketing, between the transaction name and the part
number and clicks .
The system immediately performs the operation.
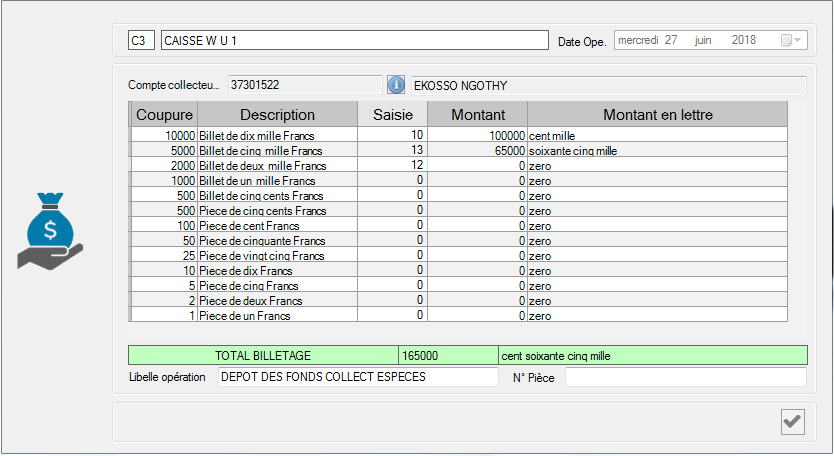
Front Office: External deposit
This form allows funds to be transferred from the collectors to the
cash-desk.

The user selects the account number of the collector by clicking on the
button
.
The list below is displayed:
 .
.
He/she performs the ticketing, between the transaction's
wording and the number of the coin then clicks on
.
The system immediately performs the operation.
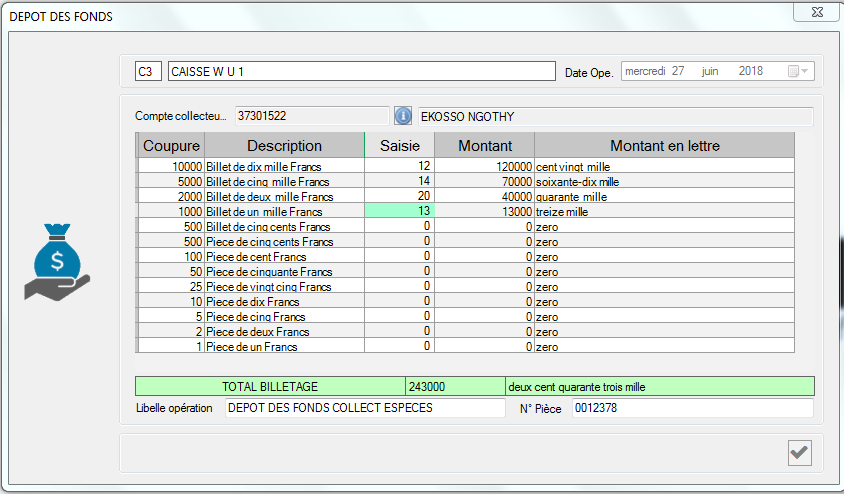
Front Office: Collector Funds Withdrawal
This form allows funds to be taken out of the cash register and
transferred to the collector's account.
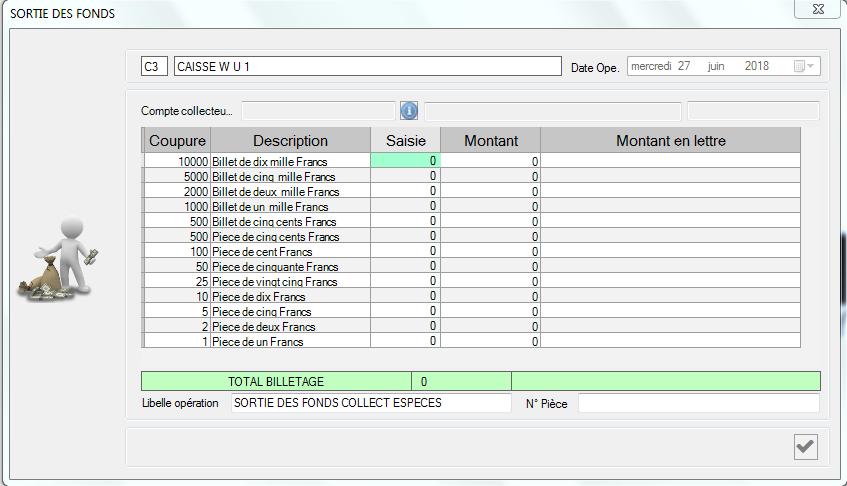
The user selects the account number of the collector by clicking on the
button
.
The list below is displayed:

He/she performs the ticketing, between the transaction's wording and the
number of the
cash/coin then clicks on .
.
The system immediately performs the operation.
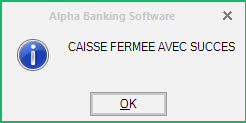
Front Office: Cash Desk closure
This section allows you to close an already opened cash register.
This form is as follows:
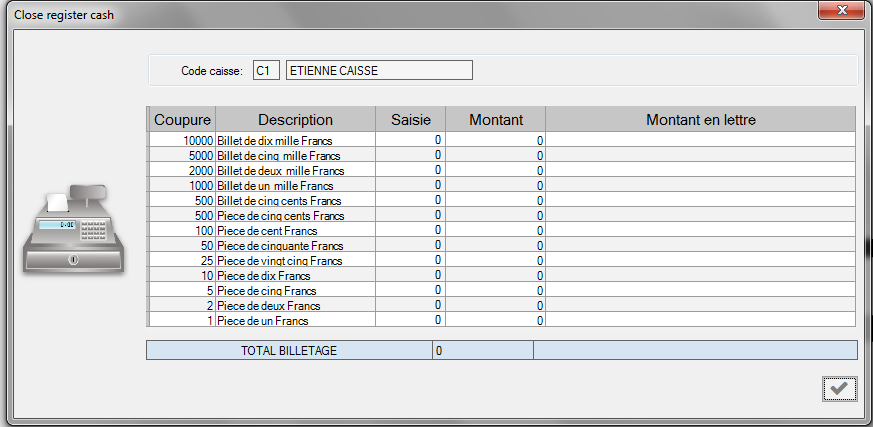
The user enters the ticket corresponding to his cash register.
NB: A cash register can only be closed by the user who
opened it.
Click on ""
close the box. The following dialog box appears:
If the checkout is already closed, opening the form will just return this dialog box:
Back Office
This menu concerns:
-transaction entry,
-batch validation and
-account transfer.
To access it, go to the Treatment »BackOffice
menu.
Back Office: Entering Transactions
Procedure: Processing » BackOffice » Entering Transactions.
This section deals with the entry of debit and credit transactions
in the customer's account and their registration.
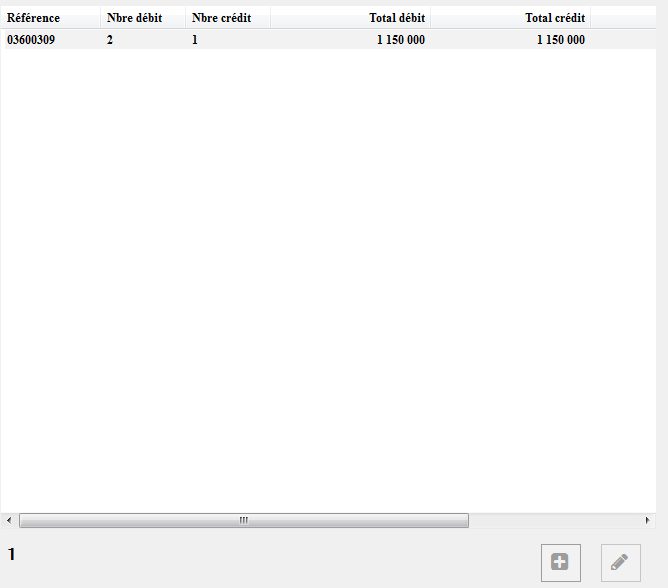
This form is used to define the situation (number of debit and credit, the
writing'[inputs])
of each batch entered by the user who is connected.
To enter the data concerning the operation, click on
 .
.
The following form appears:
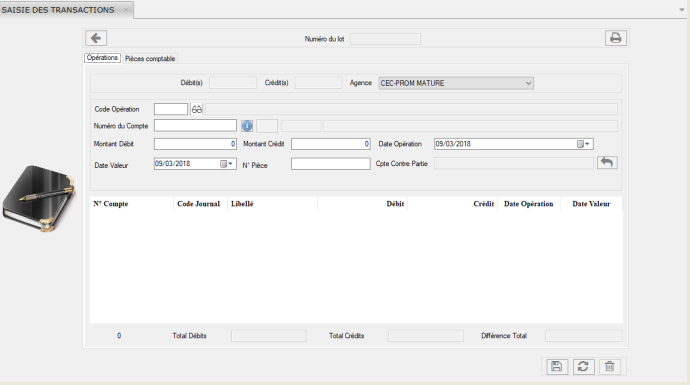
This form deals with the entries and the modification.
To add a new
batch(record);
-Enter the details of the transaction (code, account number, debit
amount,
credit amount, the transaction date will appear automatically, value date
that appears
depending on the nature of the transaction on the Account,
It can be
modified as
the 'date value' of the transaction by the user after the entry,
Click
on the »button to validate.
In case of error, or forgetting to write (inputs), modification or
cancellation is possible.
-To modify an operation (account, or amount in the batch (record)
number,
-It is necessary to select a writing, and either click on the
button, or double-click on the input.
The operation appears with its elements in the text field.
You can
edit and click
to save and commit the changes.
In case of erroneous data entry,
Cancel by clicking on the
button.
To delete the data, click on

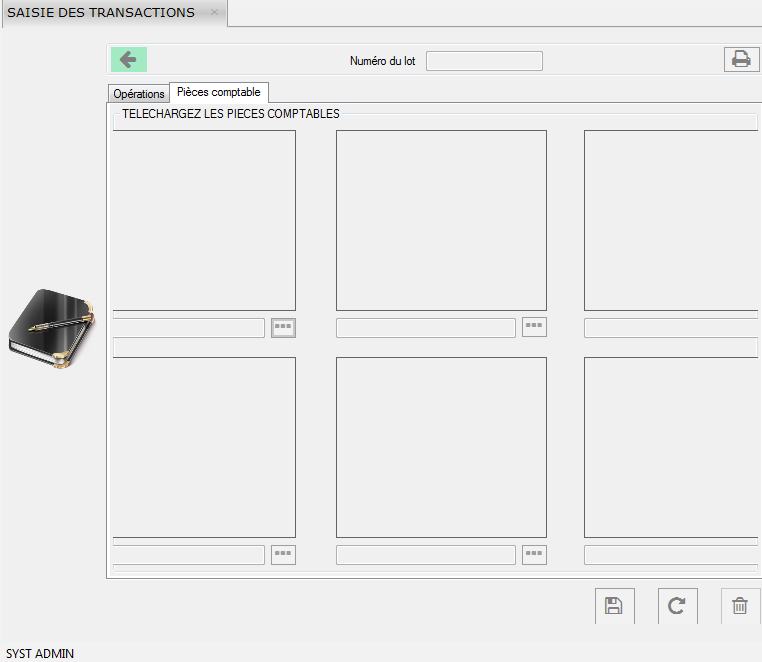
It is possible to add an accounting document to a batch (record) number,
This just by selecting the "accounting document" tab.
-To do this, click on the  "Browse" tab of the tab,
select the image and save.
Click on  to print.
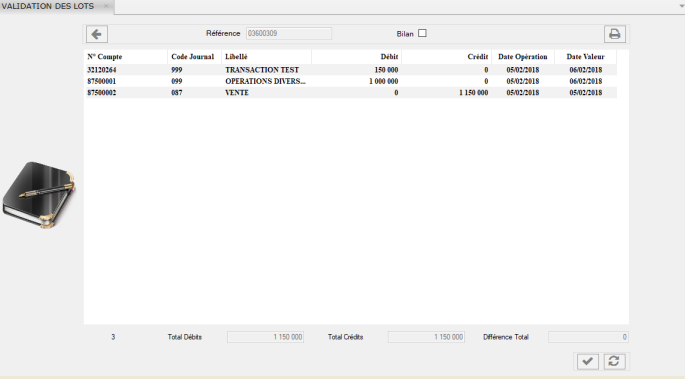
Back Office: Batch(Record or Inputs) validation
Regarding the validation of the batches (records), this sheet shows the
list of entries to validate.
It is important to know that the user who entered the entries cannot
validate his own entries.
The validation of an entry (input or record) is done by a user having
the validation rights.
For this validation, it is necessary to select an entry (input or record),
and either click on
 to modify, or double-click on the batch (input or record).
To access
the batch validation form;
go to the menu "BackOffice" »Validation of batches (input or
record).
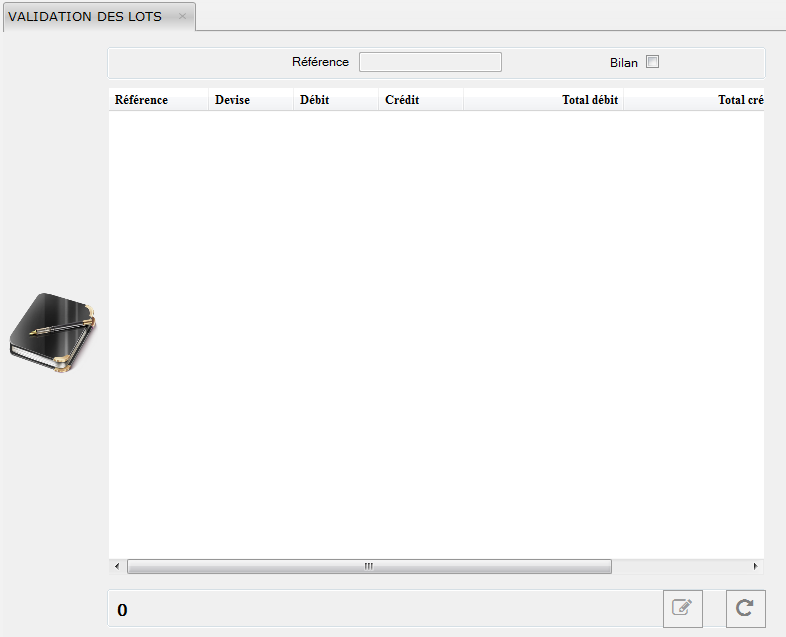
The operation appears with its elements in the text field.
You can
modify and click on the
button.
To cancel the entry, click on
.
Back Office: Transfer from Account to Account
This form makes it possible to carry out a cash transfer from the account
of the payer
to that of the beneficiary.
To make the transfer, click on
 and fill in the form.
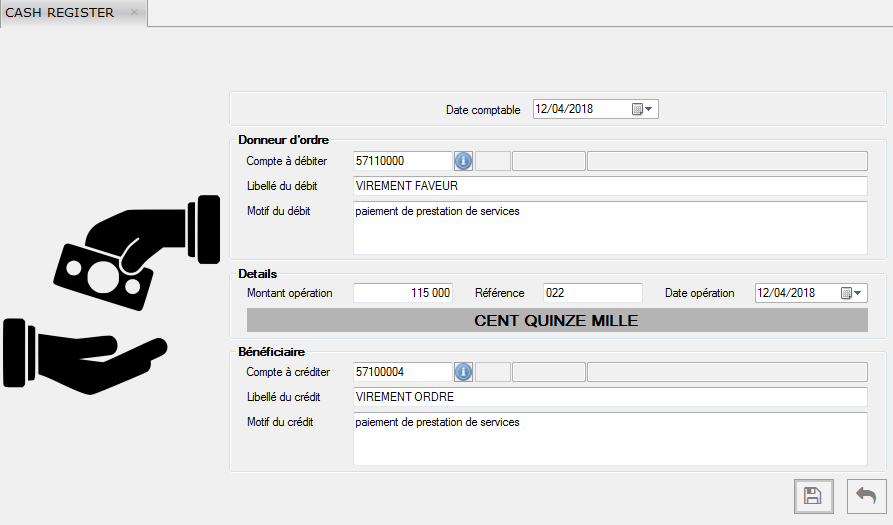
Click on
to save the document and
to exit.
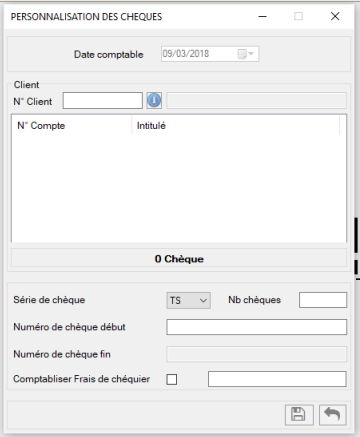
Back Office: Internal cheque book management
As indicated, this menu deals with the internal management of the
checkbook held by the customer.
To access it, go to the menu Processing »Internal checkbook
management.
Customization of checks
The check personalization form allows you to customize the checkbook at the customer's request.To fill in this form, you must enter the data in the various fields and click on
to save the document and to exit.
Checkbook Entry
This menu allows you to register the check according to its type and serial number.When input is disabled, this dialog box is displayed:
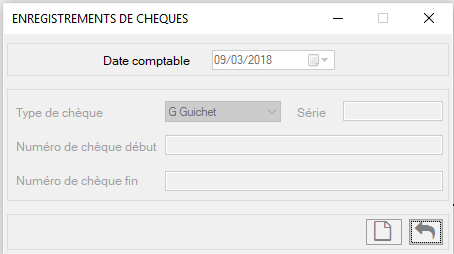
To activate it, click on
;
the following form appears:
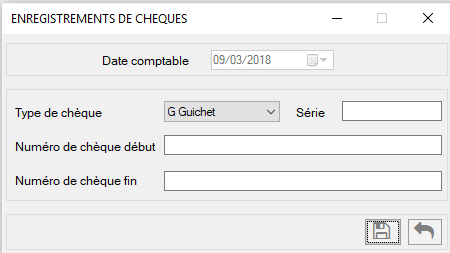
To save the checkbook, click on
and to exit.
Check situation
This section shows the situation of the checkbook at a given period.It is used to display cashed checks(checks on the cash-desk), unused checks, wickets and blocked customers if they exist.
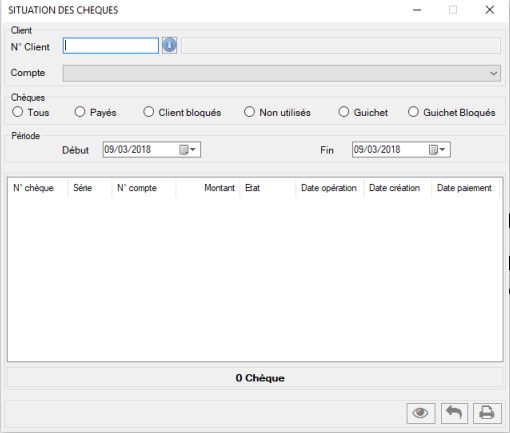
To see this information, click on
 ,
, Click on
to print,
Click on
to exit.
Loan
Note: Before entering into loan management, the agency has to set configurations for the loan type.So that any loan taken should be of a particular type and well managed.
Types of Loan
Function: This is where the different types of loans are created. so that
whenever a member wants a loan, they can determine the type of loan in order to know how it will be managed.
Once on the loan type page, click on to activate the form.
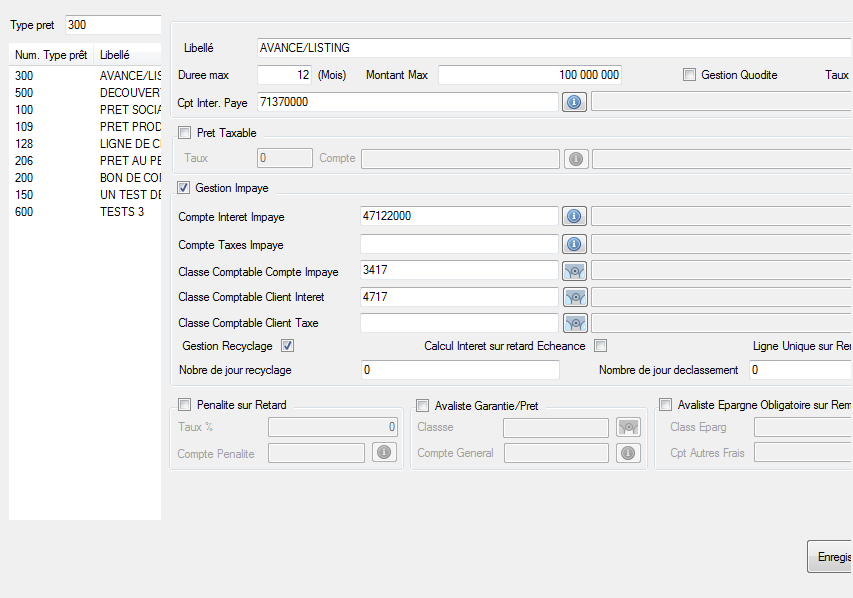
To choose a loan, simply select the type of loan and fill in the
information
concerning this loan.
Click on the "save" button and
close.
You can update the saved label or track the record.
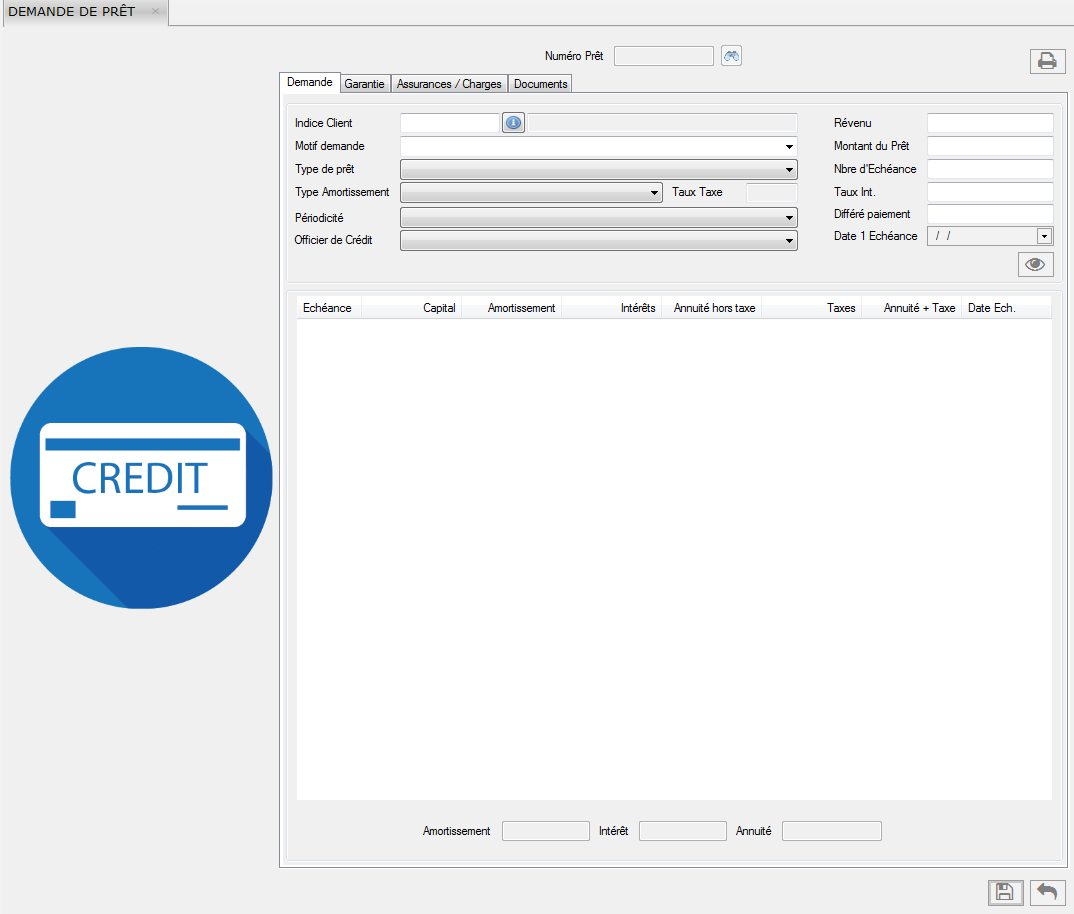
Loan Application (Request)
Function: This sheet allows members to apply for a loan at the microfinance.
Obtaining a loan follows a well-defined process.
For this to be
possible, the system administrator must configure the loan request.
Go to: Loans Menu >> Loan Application
Once on the loan type page, the loan form opens, BUT is deactivated.
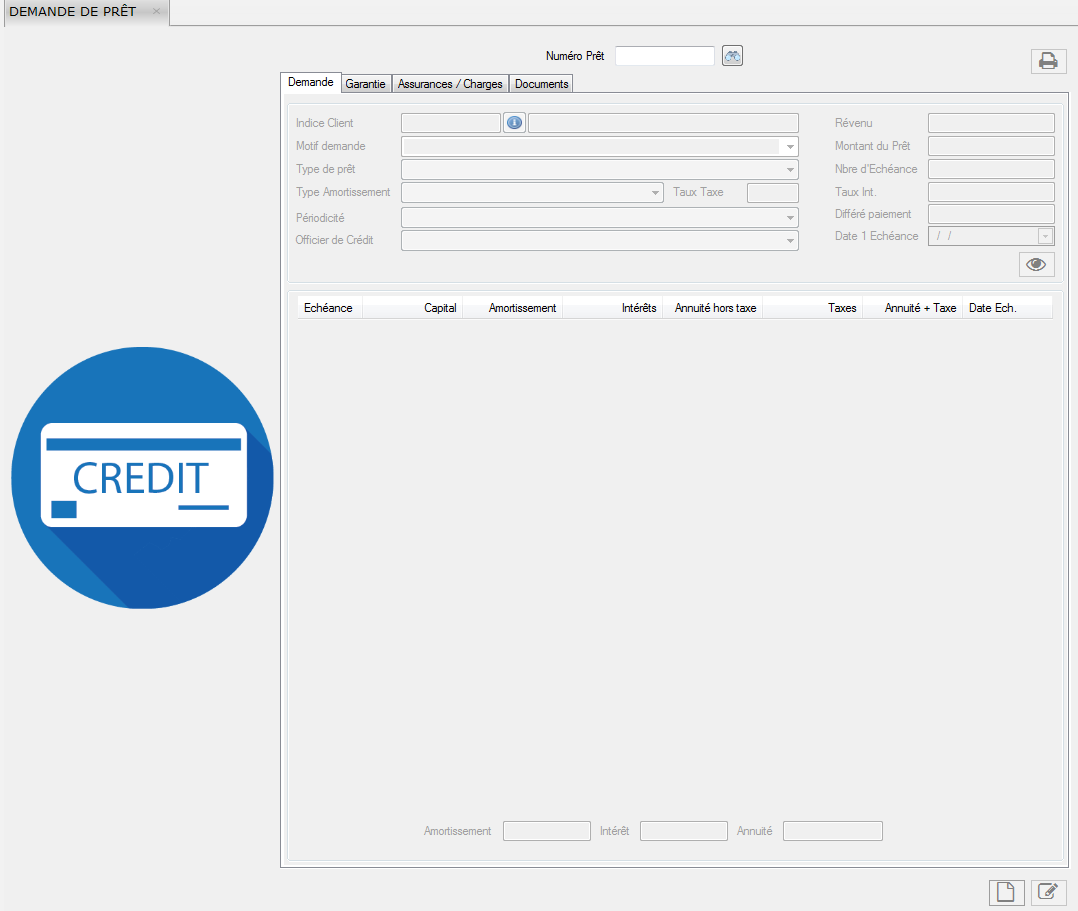
To apply for a loan, click on , to activate the form.
The following form appears:
The user selects the loan number by clicking on the button and the system
automatically
generates all the information requested in the sheet namely
The index
and the name of the
customer,
The income of the applicant,
The reason for the loan
request that the client
wishes to obtain,
The type and amount of the loan as well as the number
of due dates,
The type of depreciation,
The interest rate,
The periodicity
of repayment,
The deferred payment which makes it possible to know when one
calculates the
amortization, maturity and the money back guarantee.
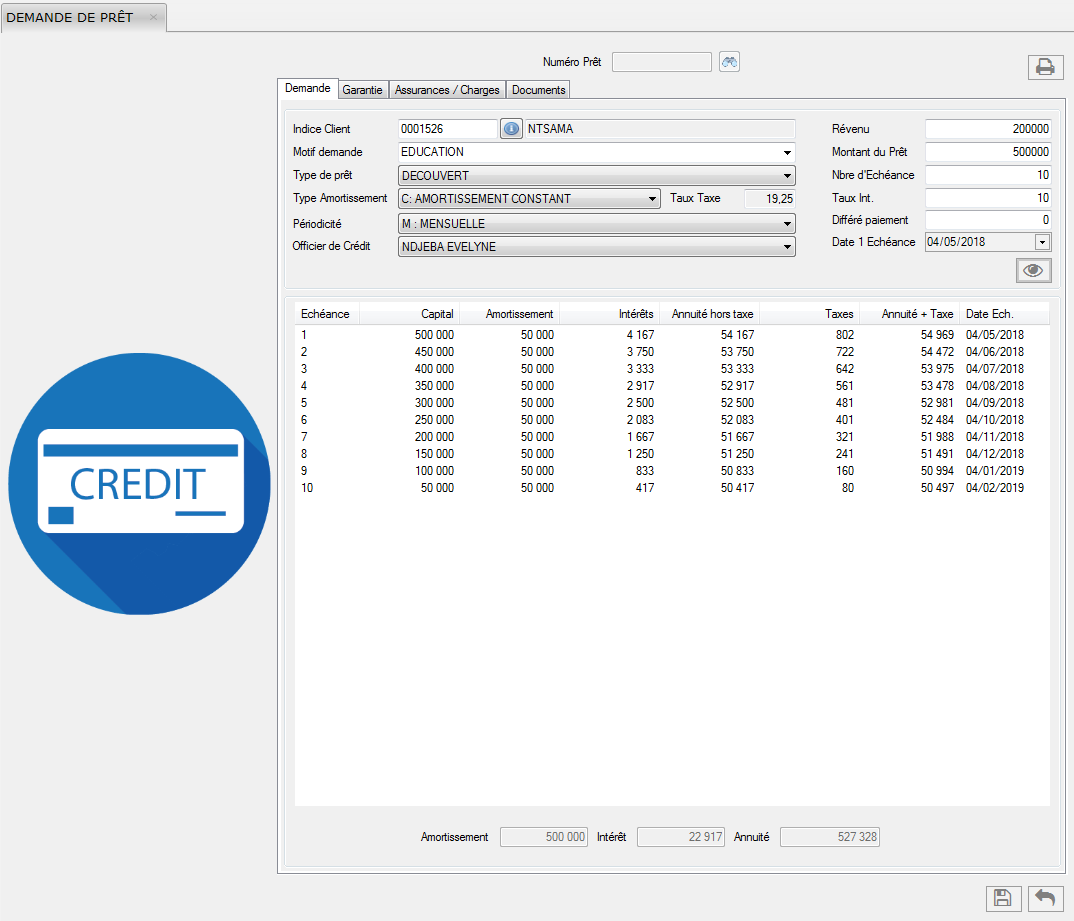
After completing the form, click on
to save and
to cancel.
Once successfully registered, a message is displayed:

To enter the customer index, the customer must click on the
button; the list below is displayed:
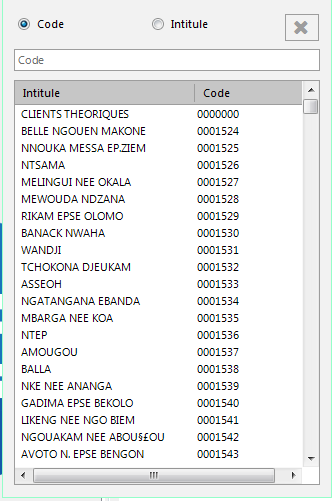
Double-click on the customer's name: the index and the customer's name are
automatically generated by the system in the fields provided for these
elements.
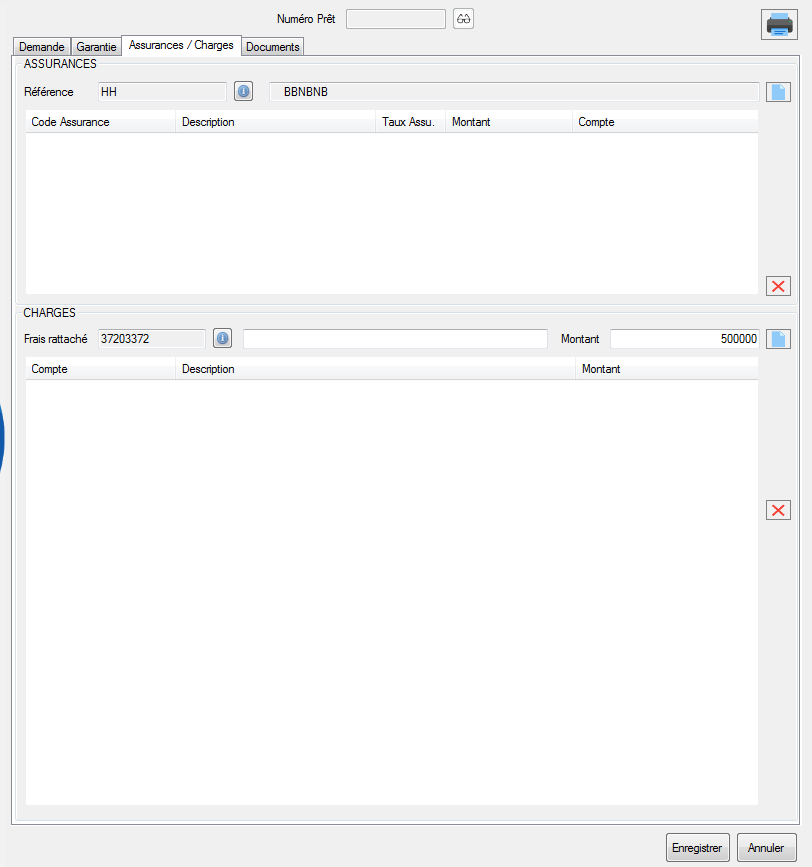
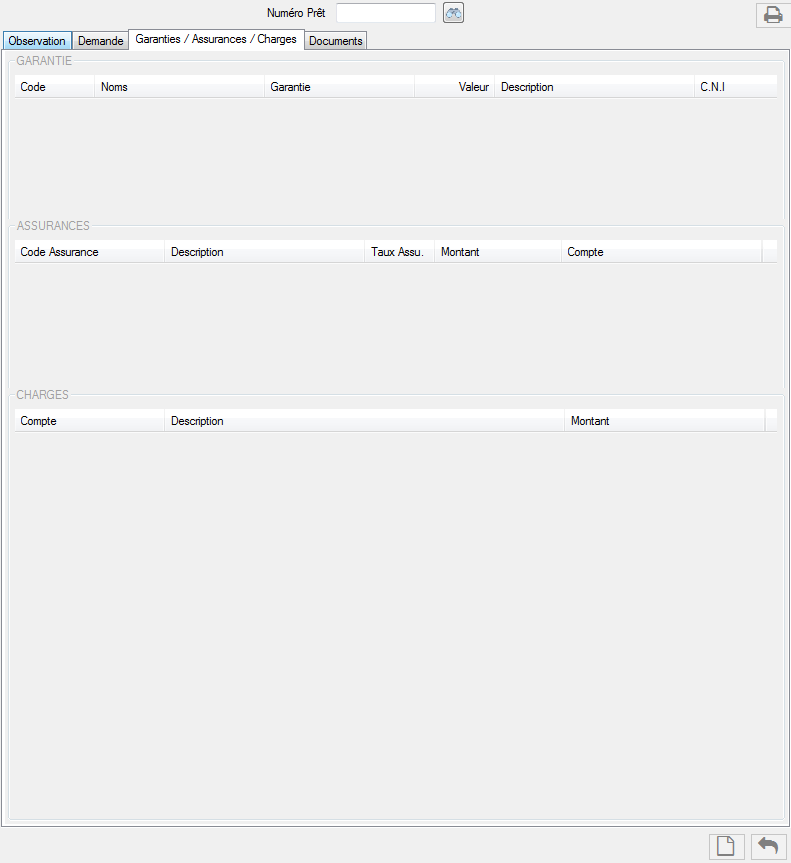
In addition to the loan application, the guarantee and insurance / expense
forms must be completed beforehand.
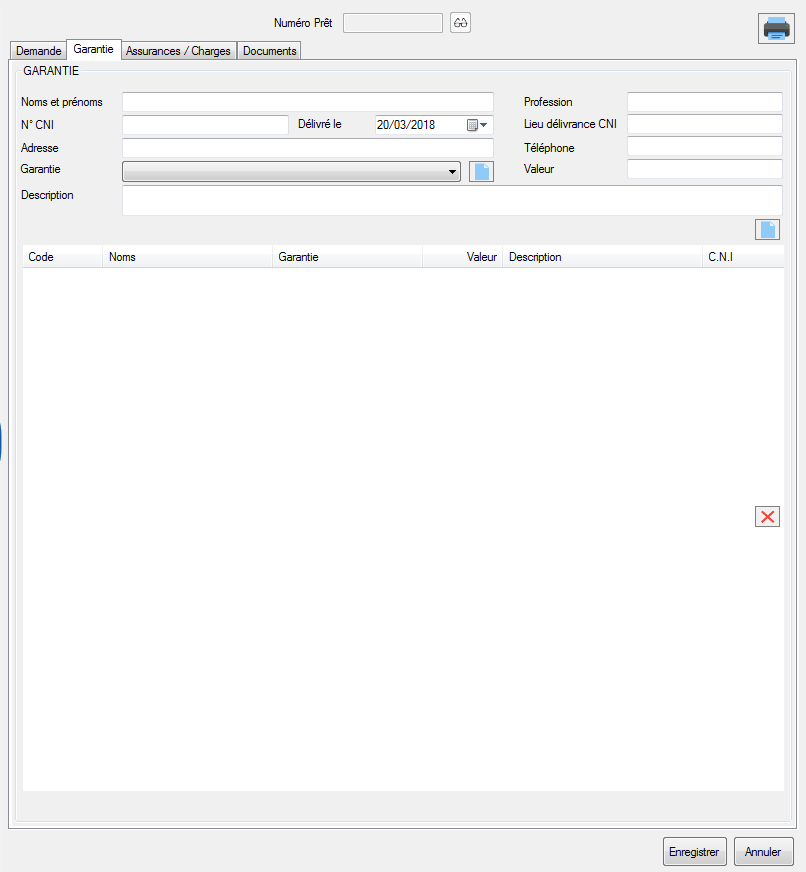
To print, click on  .
.
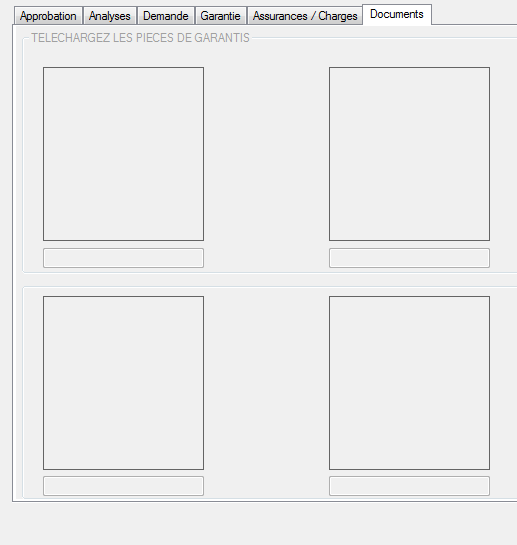
The warranty documents are downloaded from the document card.
Loan Analysis
loan-analysis
This form allows you to perform a loan analysis for approval.
To access this sheet, go to the menu Processing »Loan Management»
Loan Analysis.
The following observation form appears:
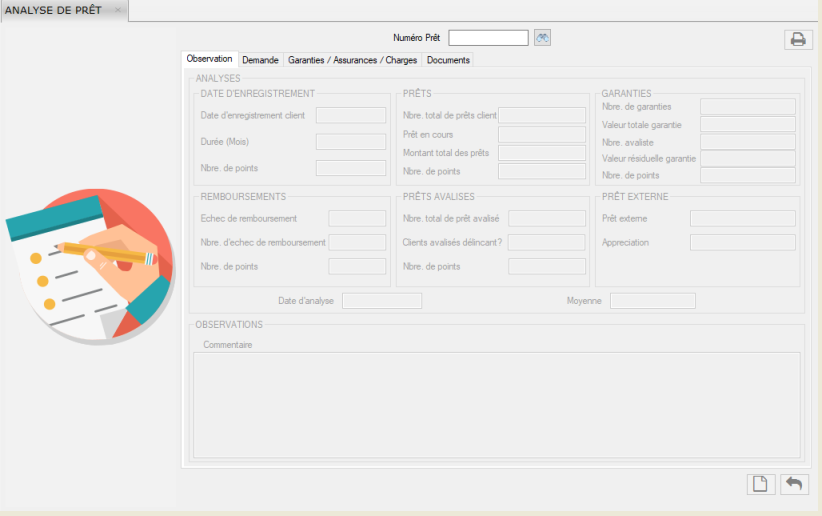
To enter the customer data and print it, click
and
respectively.
To cancel, click on .
For a new analysis, click on « ».
The form below is displayed:
After completing the form, click on
.
to save and to cancel.
Loan Approval
The customer having made the request, it must be approved.
Just fill out the following loan approval form
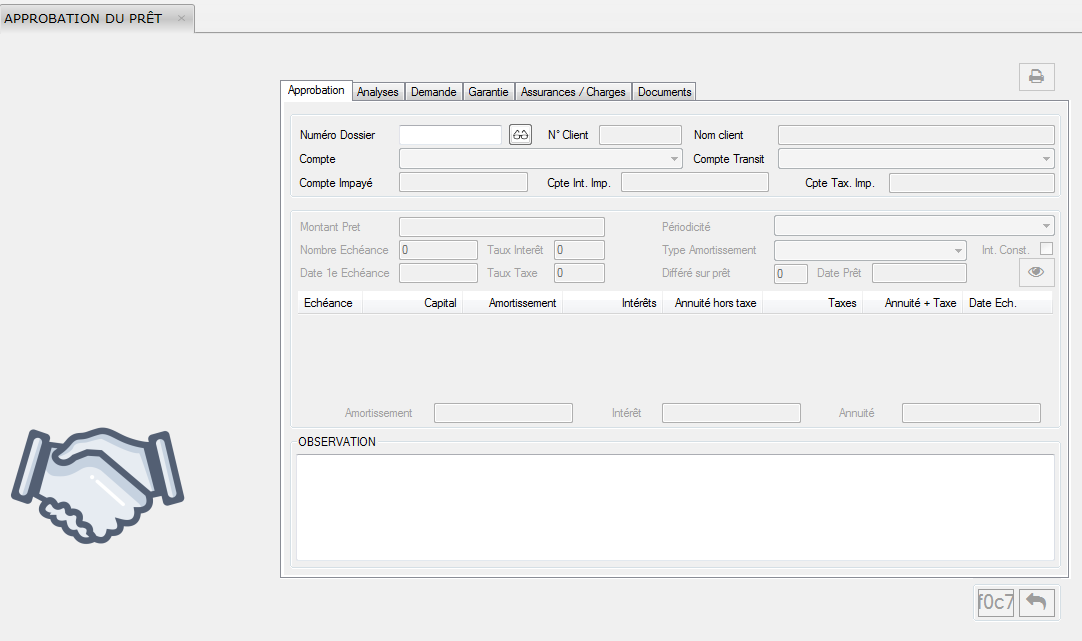
After entering the data, click on the .
button to save this data and .to exit.
In addition to the other forms, the loan approval sub-menu includes the
analysis sheet
that analyzes the loan application.
It is as follows:
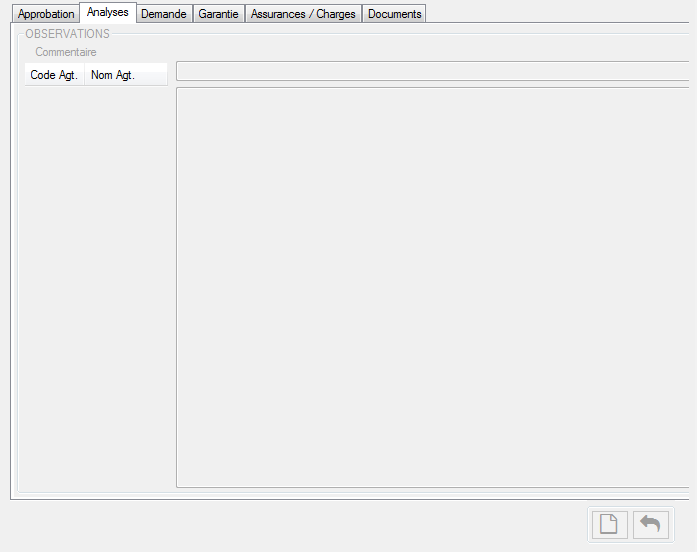
For a new analysis, click on
and
to cancel.
Release of funds
This submenu allows the transfer and provision of funds from the
customer's account.
To access this sheet, go to the menu Processing »Loan
Management» Release of funds.
It is as follows:
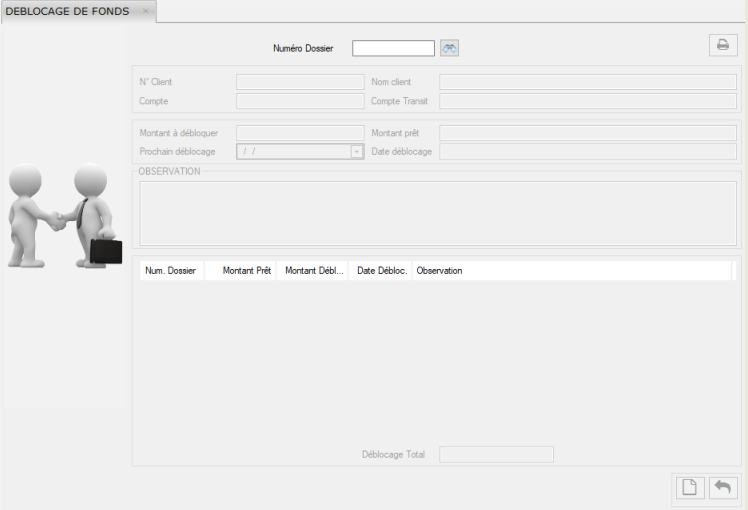
The user clicks on
and enters the information about the loan (the file number, number and name
of the
customer, his account and the transit account, the amount to be unlocked,
the amount of the loan and the date of the next release).
To save, click on
and to cancel.
If the customer can not benefit from a loan, when entering the file
number,
the system will send the message:

Cheque processing
To access this sub-menu, go to the Treatment menu »Check Processing. This menu includes the following items:
- Cheque Payment Entry
- Cheque validation
- Cheque Payment
- Situation of the customer's Cheque (Customer cheque status)
- Internal Cheque payment Entry
Cheque Payment Entry
This form is used to record the Cheque payment from confreres.
Microfinance receives the Cheque and verifies that the account to be
debited
has the necessary funds.
The Cheque can be registered either at
collection
on the cash desk or immediate credit.
1. Cashing
Procedure: Processing Cheque processing» Cheque Payment Entry
»Cashing .

The receipt form allows the customer to cash the Cheque delivered to the
micro-finance.
The cashing of the Cheque follows a specific process, for the cashing of the
Cheque by the customer.

This sheet presents 3 parts namely:
1. The first part represents the Cheque slip.This slip contains the information on the check below:
- The date of handing cheque payment
- Customer's account number (To add a customer's number, click on the
button
,
The following list is displayed: - Name of the customer
- Billing number (To add the number of a customer, click on the button
,
The following list is displayed: - The date of handing over Cheque,
- Credit Account number
- Total amount of the slip
- Place of payment
- The date value


2. The second part represents the payment Cheque in question.
This sheet presents the following information:
- Cheaue number
- Client Account number of the correspondent bank
- Cheque payment Amount
- The collection (receiving) bank and its account number,
- The payment bank and its account number.
3. The third part is a list of all the cheques. This list shows all the checks issued.
It provides information on the following:
- Customer's Account number
- Cheque payment amount
- Date of the operation
- Date of value
- Customer Name
- The payment bank
- The place of payment
- The collection (receiving) bank
To enter the data, click on
.
The system automatically generates a list of all checks issued.

To save them, click on
.
To cancel the changes and refresh the list, click on
and
 to close.
2. Immediate credit
Procedure: Processing »Cheque processing» Coresponding Cheque
entry payment
»Immediate credit

This form makes it possible to cash the cheque delivered by the customer
in order to grant him the credit.

Like the receipt card, it has 3 parts:
1. The first part represents the cheque slip.
This slip contains the information on the cheque below:
- The date of handing over cheque
- Customer's account number (To add a customer's number, click on the
button
,
The following list is displayed: - Customer Name
- Billing Number (To add the number of a customer, click on the button
,
The following list is displayed: - The date of handing over cheque
- Credit account number
- Total amount of the slip
- Place of payment and
- The date value


This sheet presents the following information:
- Cheque Number
- Client account number of the correspondent bank
- Amount of the pay cheque
- The collection (receiving) bank and its account number
- The bank paying and its Account number
This list shows all the cheques issued. It provides information on the following information:
- Customer's account number
- Amount of the pay cheque
- Date of the operation
- Date value
- Customer Name
- The paying bank
- The place of payment
- The collection (receiving) bank
Otherwise, the dialog box will be displayed:
To enter the data, click on
.
The system automatically generates a list of all the cheques issued.

To save them, click on
.
To cancel the changes and refresh the list, click on
and
to close.
3. Cheque Validation
This form allows to see all the slips including the various cheques
delivered by the
customers and to validate them.
To access this form, go to the menu
Processing » Cheque Processing » Cheque Validation.

By clicking on a slip, the system displays a list of all the cheques of
the latter:
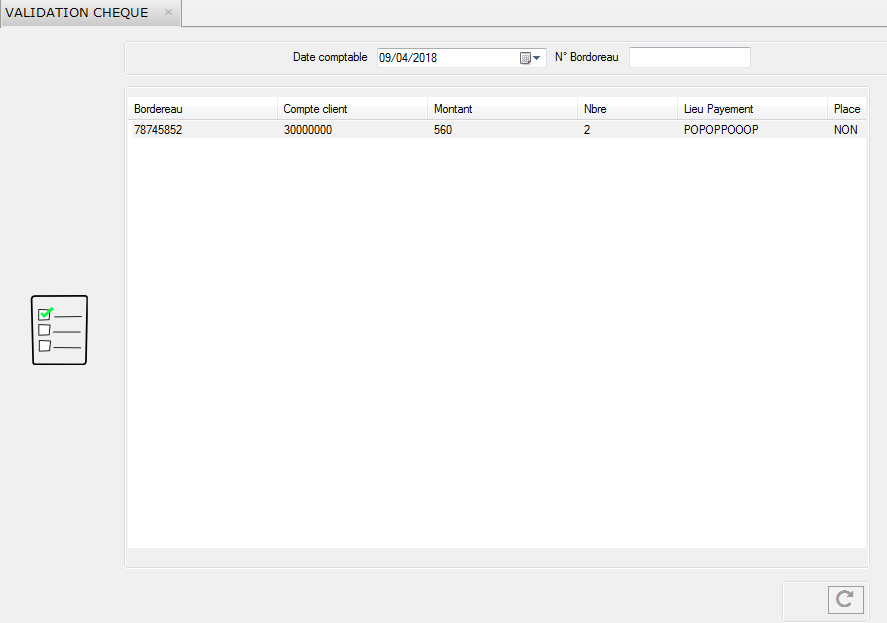
To validate a slip, the user must enter the posting date and check slip
number.
To refresh the list, click on
«».
4. Cheque Payment
This document shows the status of the check.
To access this form, go
to the menu
Processing Cheque Processing» Cheque Payment.
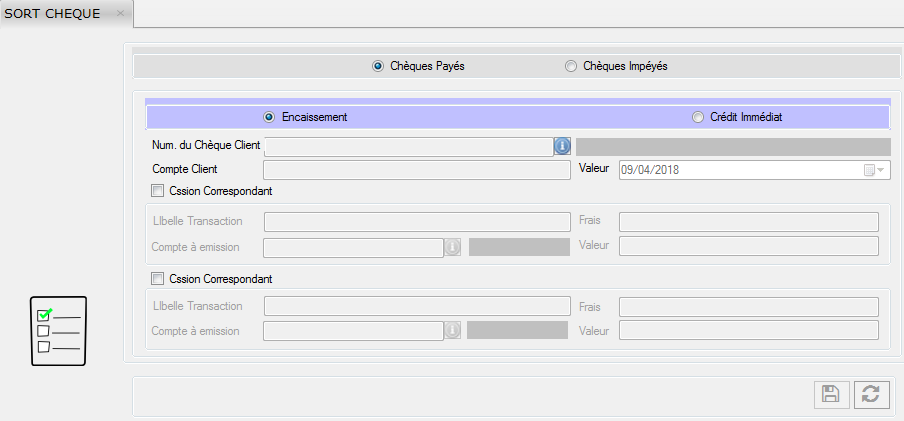
- Choose the type (paid or unpaid) and the nature of the check (cashing or immediate credit).
- Enter or select the check number in the form.
To select the cheque number, click on the button
Then Click on the number field.
The following list is displayed: - Clicking on the member's Account number, allows it to appear automatically.
- To save, click on and
 to cancel the entry.
The data is generated automatically according to the check configuration.

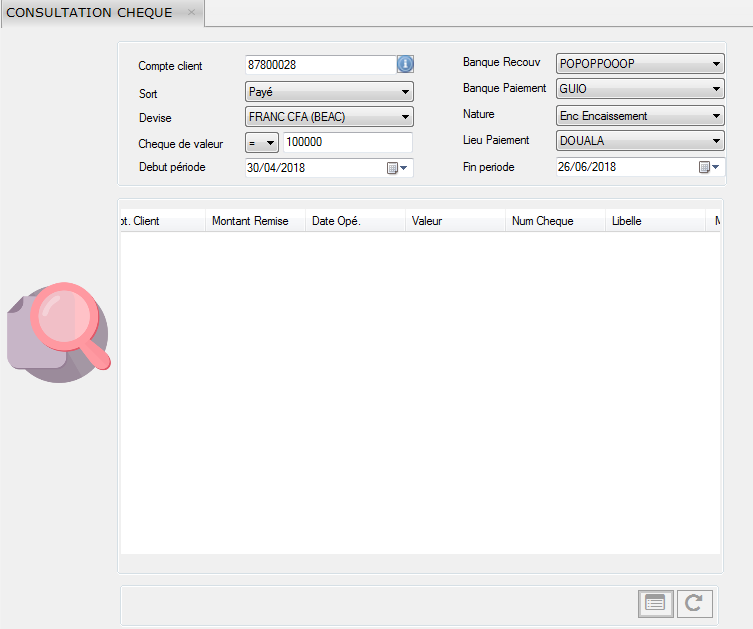
5. Customer cheque status
This form allows you to see the status of customer checks during a given
period.
To do this, the user must enter the information concerning the cheque
requested in the form:
Customer's Account number: To add a customer's number,
click on the button .
Click on the number field.
The following list is displayed:

Select the customer Number
- The collection (receiving) bank
- The pay cheque
- The payment bank
- Currency
- The nature of the cheque
- The cheque value
- The place of payment
- The starting date
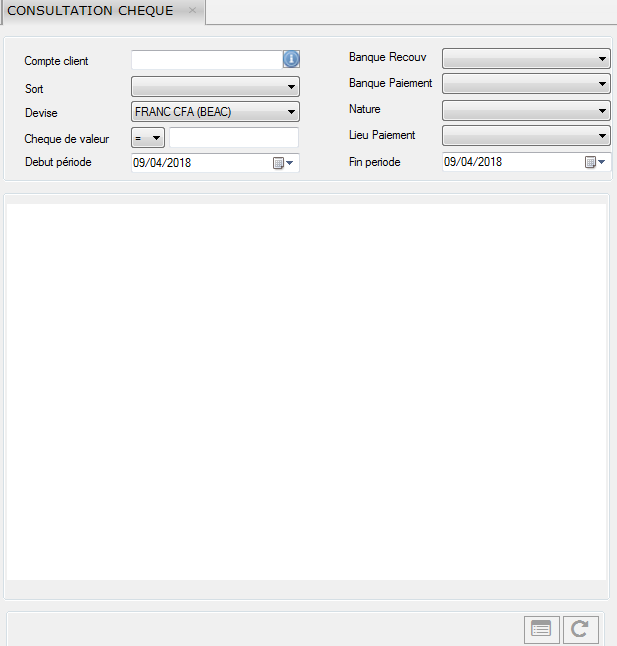
Click on
 to display.
The system automatically generates the document.
to display.
The system automatically generates the document. To save, click on
and
to cancel.
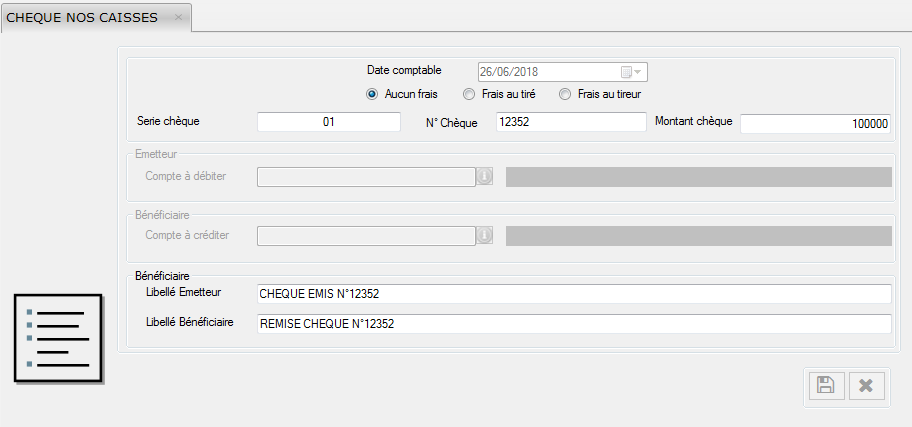
6. Internal Cheque payment Entry
This form allows you to enter the cheque issued by a micro-finance
customer for
another who also has an account within the agency.
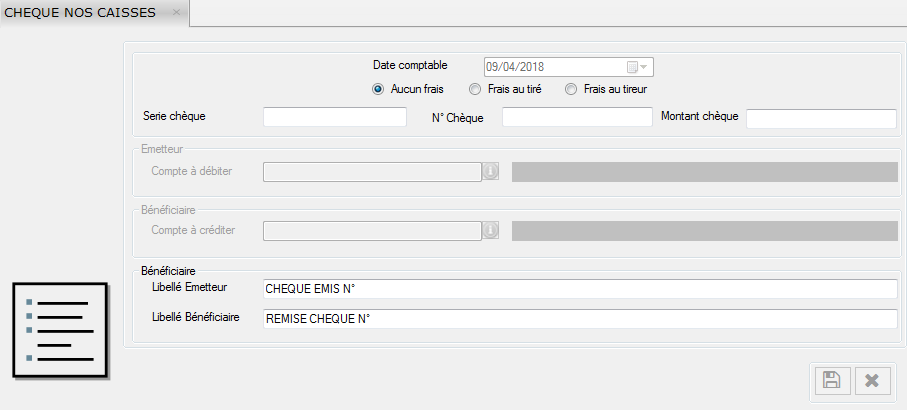
The user must enter the serial number of the check, number and the amount
of
the check, the account number to be debited (issuer) and to be credited
(beneficiary) and click respectively
and
to save and cancel.
Updated Controls
The main novelties of Alpha are its bilingualism, its quick access by means of shortened keys.
- Keyboard shortcuts
- Alt + F: scrolls the file menu
- Alt + A: scrolls the help menu
- Ctrl + N: open the form for sending messages
- Ctrl + O: open the message import file
- Alt + P: opens the system configuration file
- F1: open the help file
- Shift + F1: open the form about
- Alt + F4: close a window
- The Bilingualism of Virtual Alpha Alpha is set of applications that can be used in either English or French. Switching from one language to another is instantaneous, this is done durig the login process.